Converting MMD to SL Models
Second Life is well known for its random nature, ripe for crossovers of different kinds of characters to meet and converse. Often times, people may want to import a model from another 3D program like MikuMikuDance into SL as their avatar, but the process for rigging can be migraine-inducing. Lucky for you, dear reader, there's a chance your MMD model can easily (and quite cost-effectively) be converted, fully rigged, for the grid!
This is an abridged version of Zero/The Mighty Ginkgo's tutorial for converting MMD models into SL. Please refer to the original tutorial for an in-depth video process for conversion. I've simplified it into this written format to streamline the process for those who are already experienced with Blender and Avastar, and also show it on a more modern version of Blender; I am using 3.4 with the pink theme found here in the screenshots.
This tutorial most likely isn't very beginner friendly, although I will say it was my first serious foray into Blender. It requires Avastar, Onigiri, CATS, and a few pose models for conversion/loading. It also requires a model to convert: I'll be converting Cheren from Pokemon Black and White's MMD rigged model from Pokemon Masters for this tutorial, found here. You can get the pose files, CATS, and Onigiri here as they were provided by Zero, but not Avastar. The .zip file is safe to download; I compressed it myself.
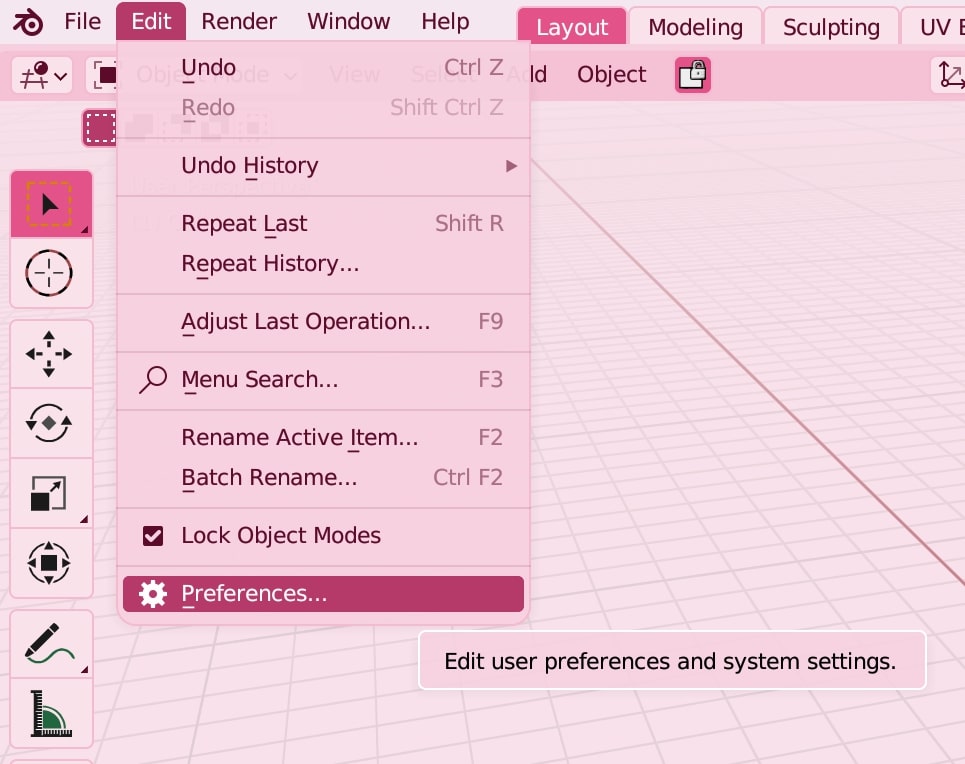
If you haven't already, begin by installing your add-ons (Avastar, CATS, and Onigiri). You do this by navigating to Preferences under Edit, then the Add-ons button, then hit Install to navigate to the .zip files.

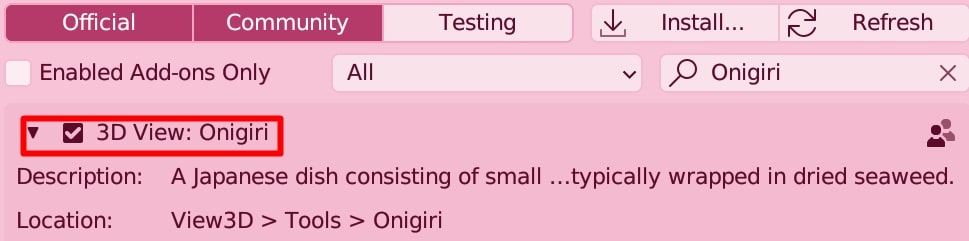
When you have them uploaded to Blender, you enable them by checking the checkmark box. Restart Blender after this.
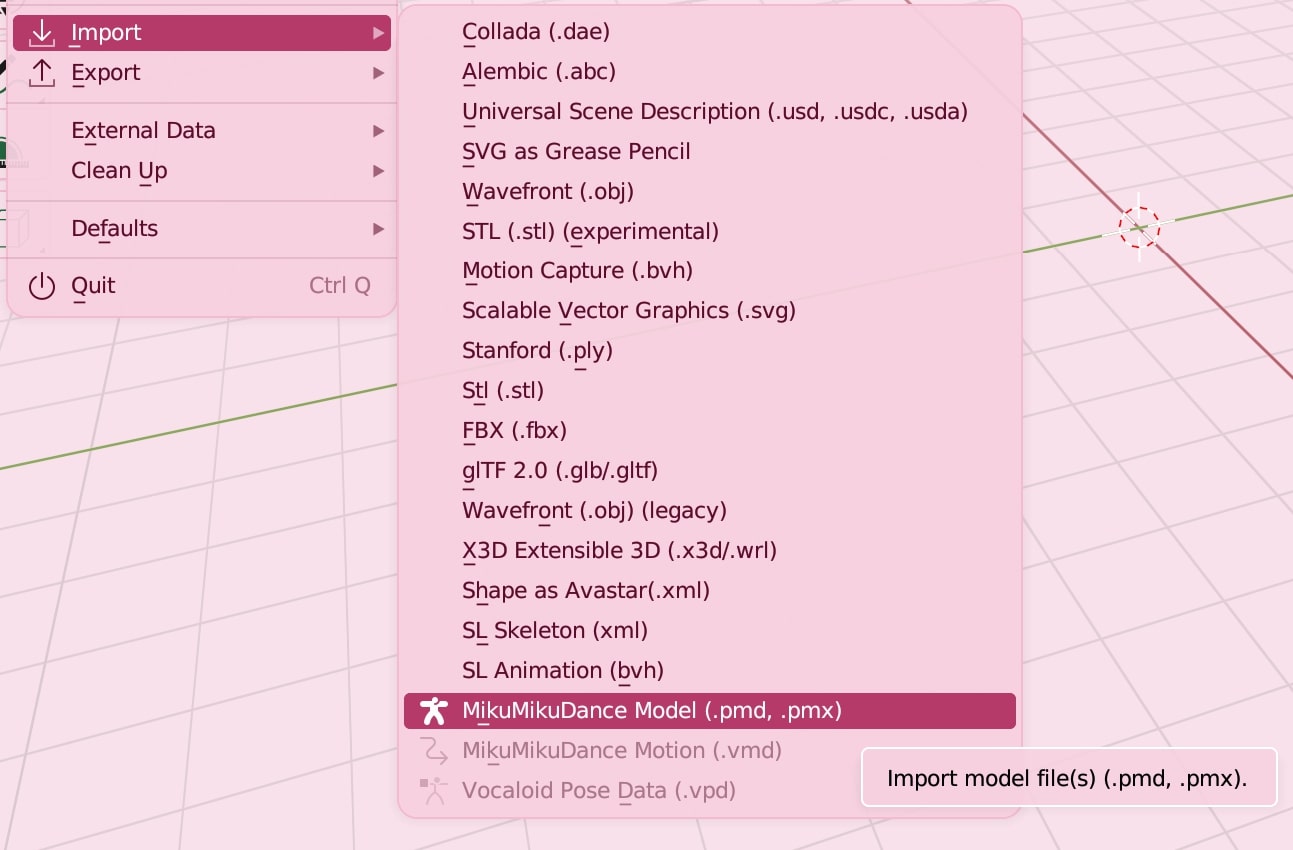
With your add-ons installed, you will now be able to import .pmd and .pmx models, which are MMD model files. Click this and navigate to your MMD model, which should import neatly, rigging and all.
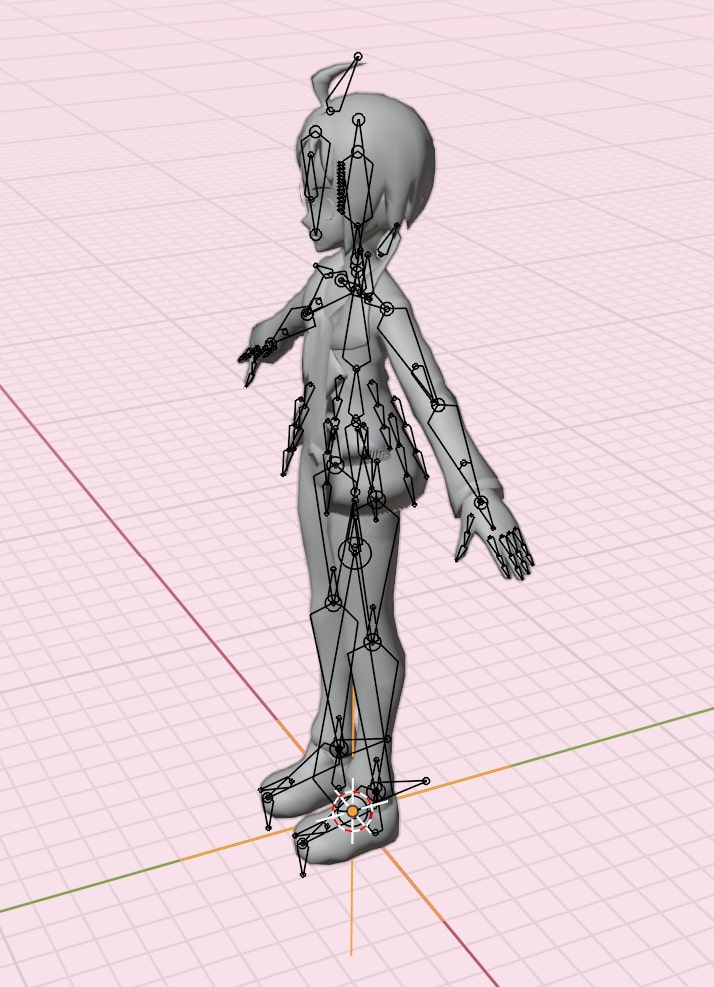
Unfortunately, Cheren is in an A-pose, which while being the default pose for MMD, is not for SL.
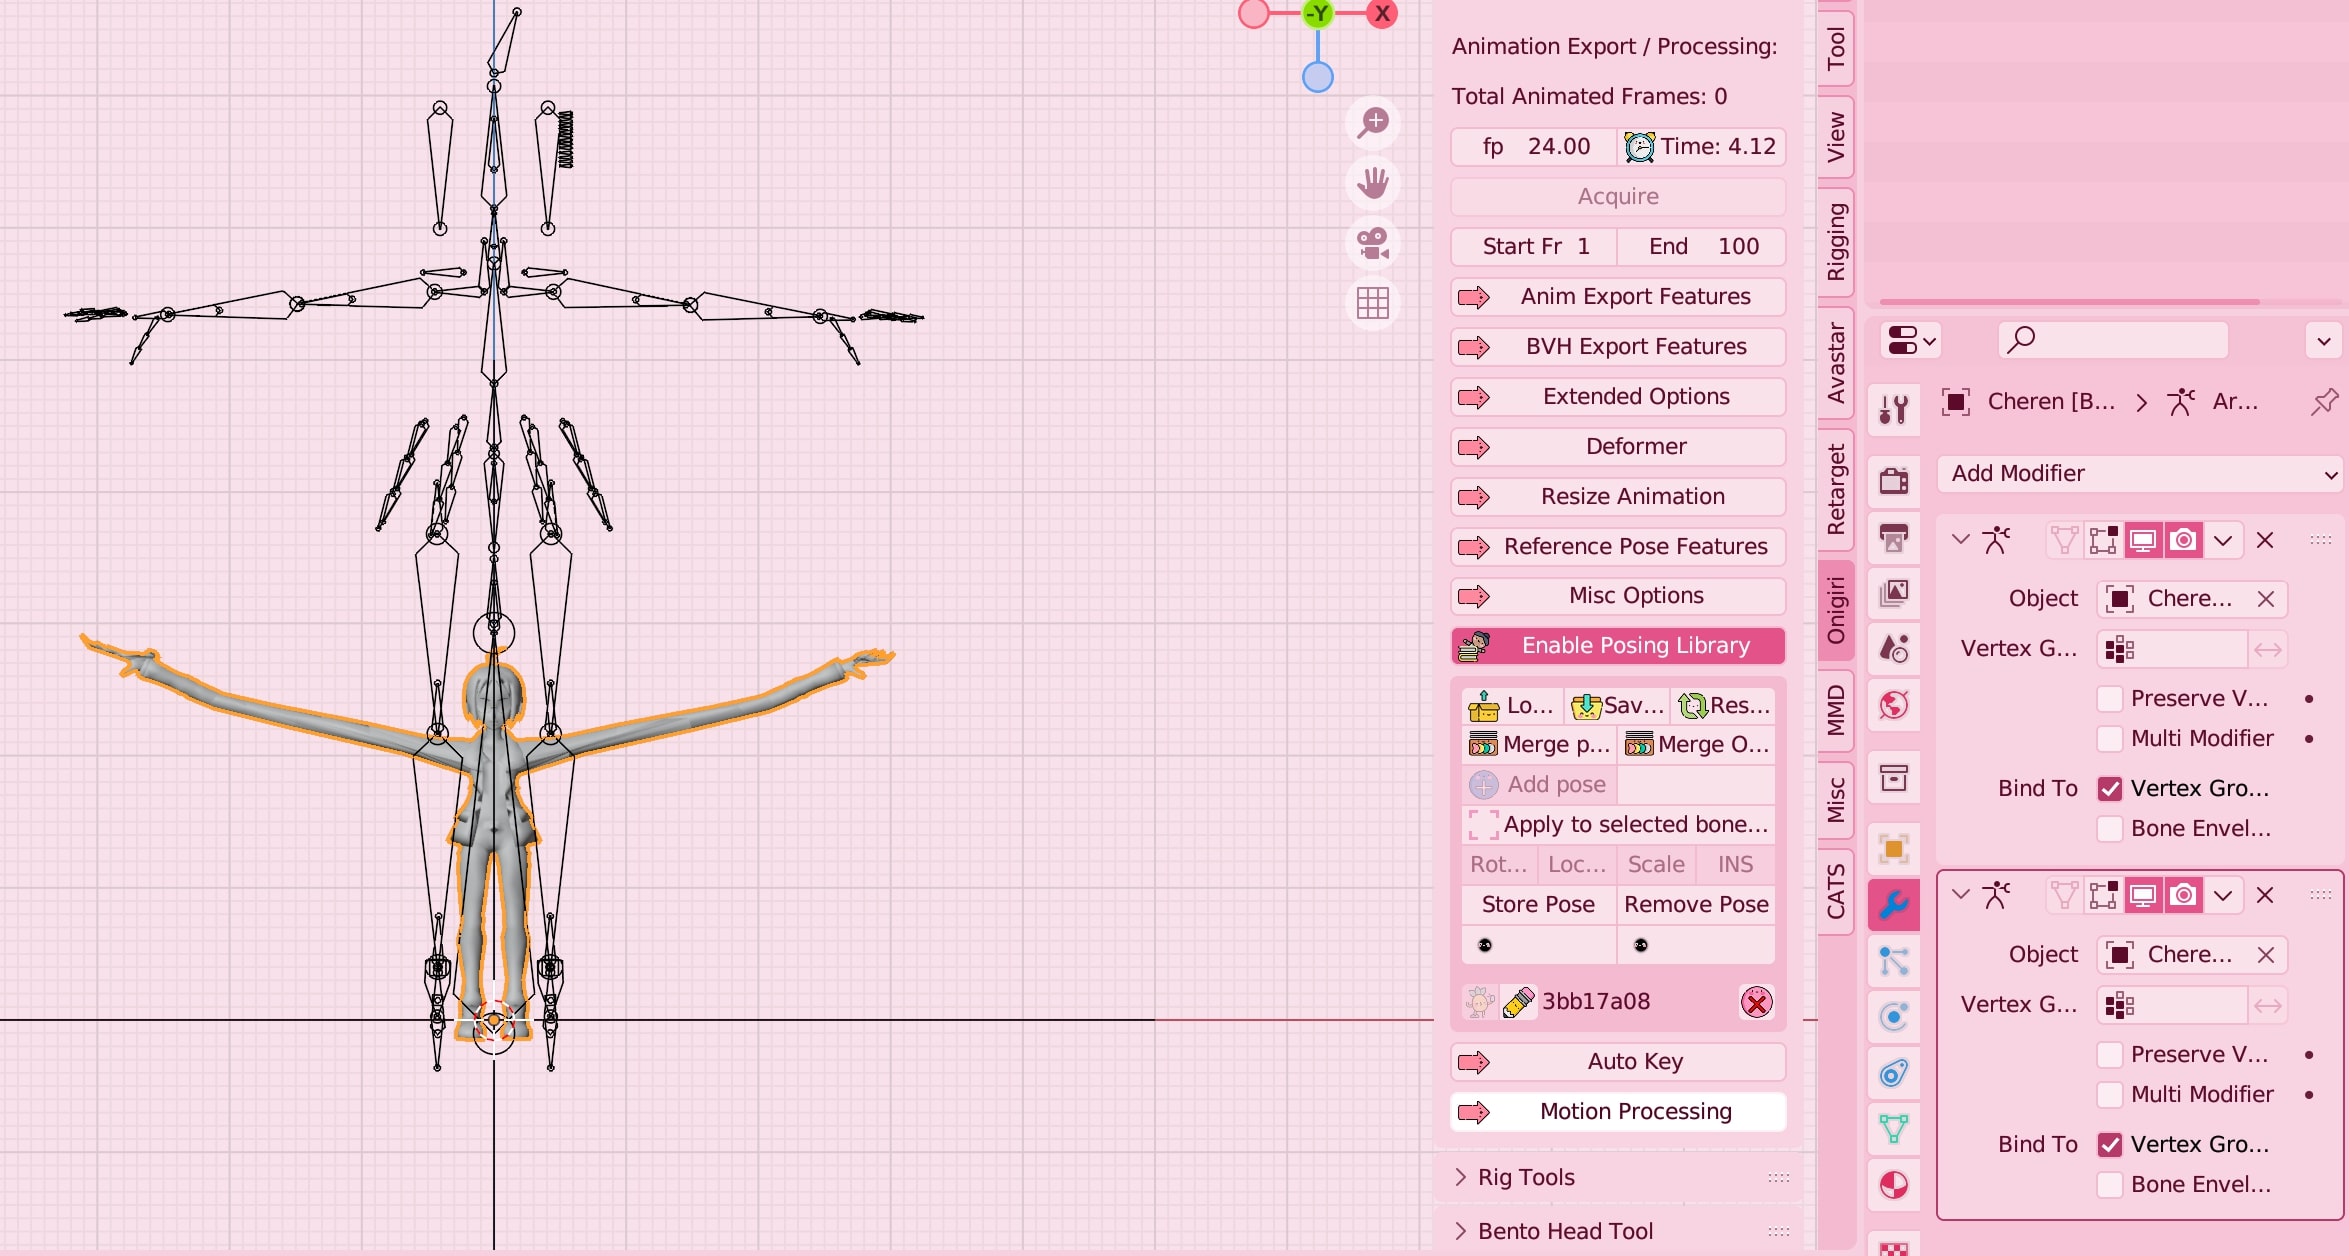
So, we have to convert him with one of the files included in the MMD2SL .zip. Select (left click) the model's bones, open the pop-out side menu, and select the Onigiri tab. Under these drop downs, select Animations, then Enable Posing Library, and hit load to load the T-pose file. This is the file with the .bpl file type. You might need to try either of them to find which works for you.
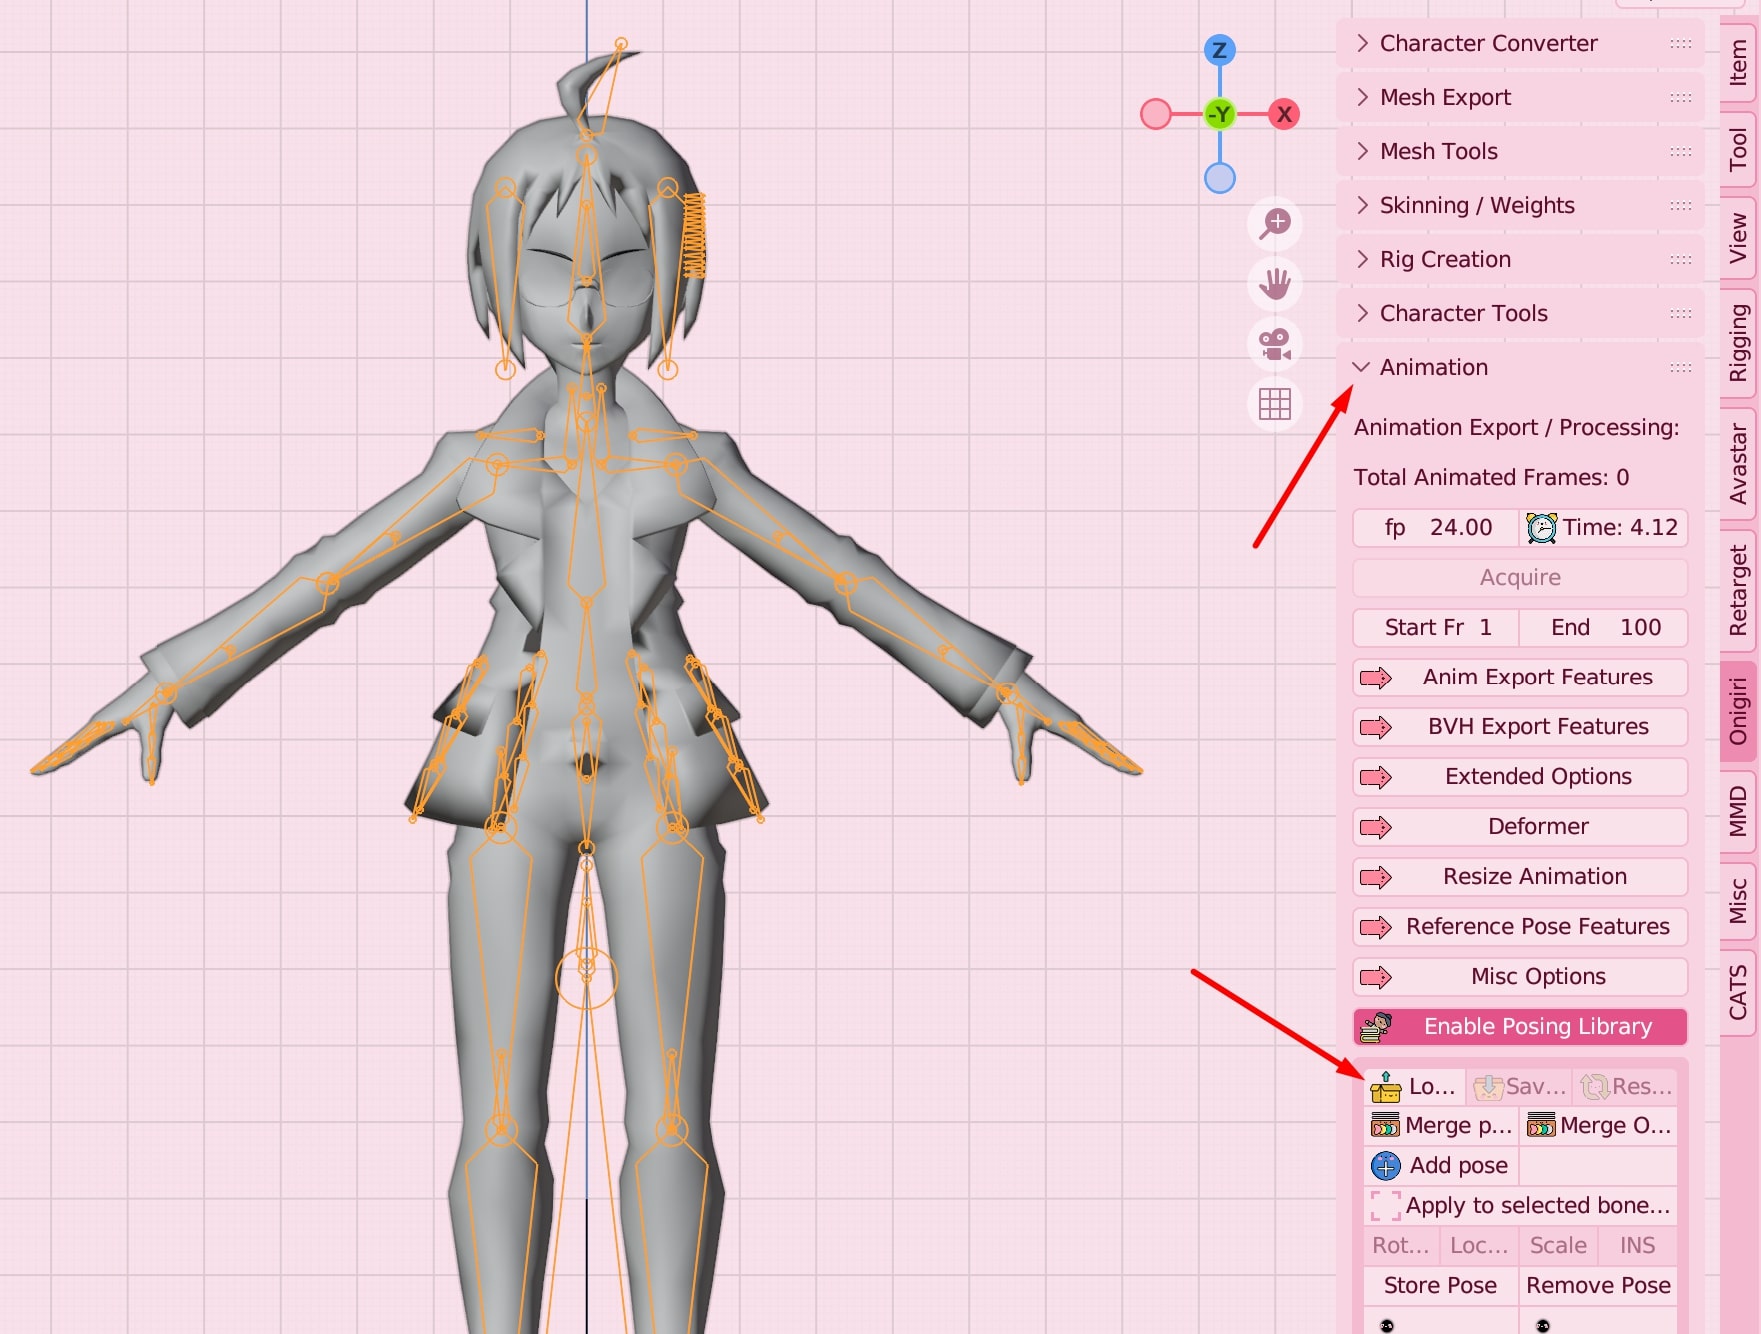
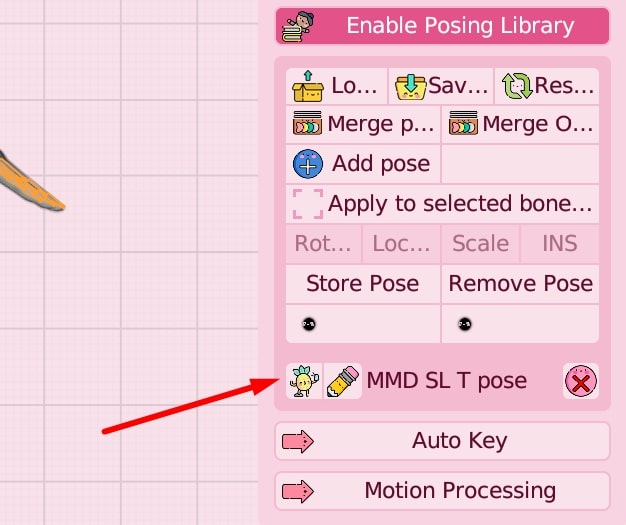
Once loaded, the file name will show up at the bottom of the drop down. Hit the happy pineapple icon to load it to the model. Your model's arms might shift.
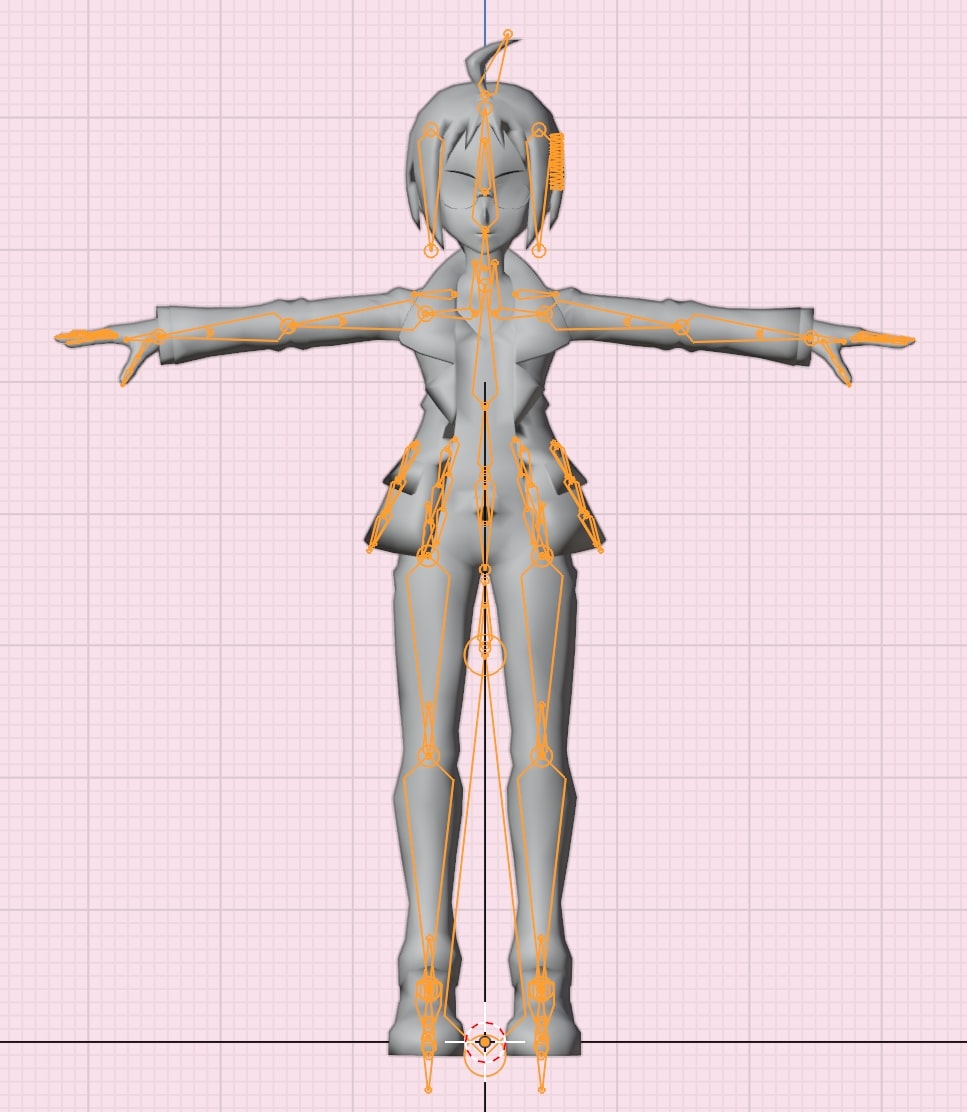
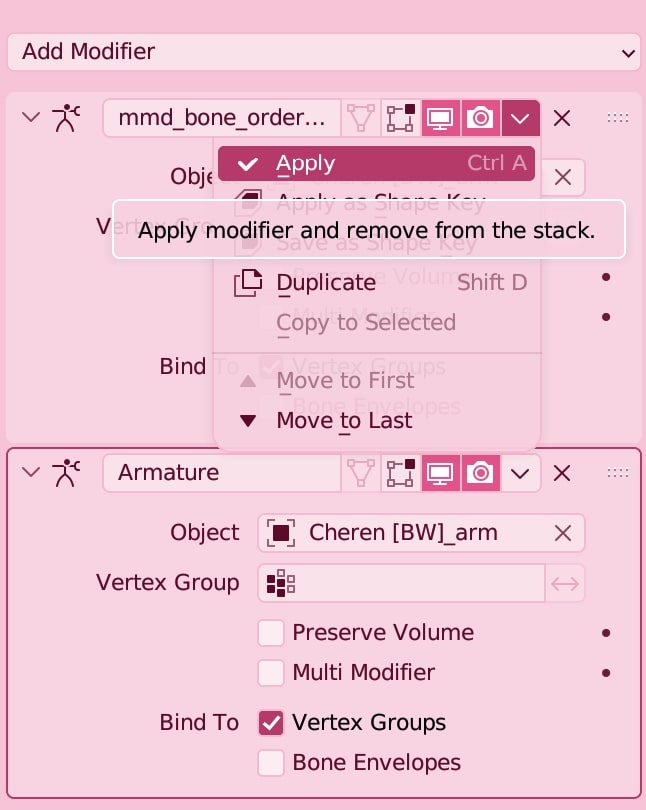
Now, select (left click) the mesh itself, and on the side menu (modifiers), select the wrench icon. From the little dropdown arrow within this box, hit Duplicate.
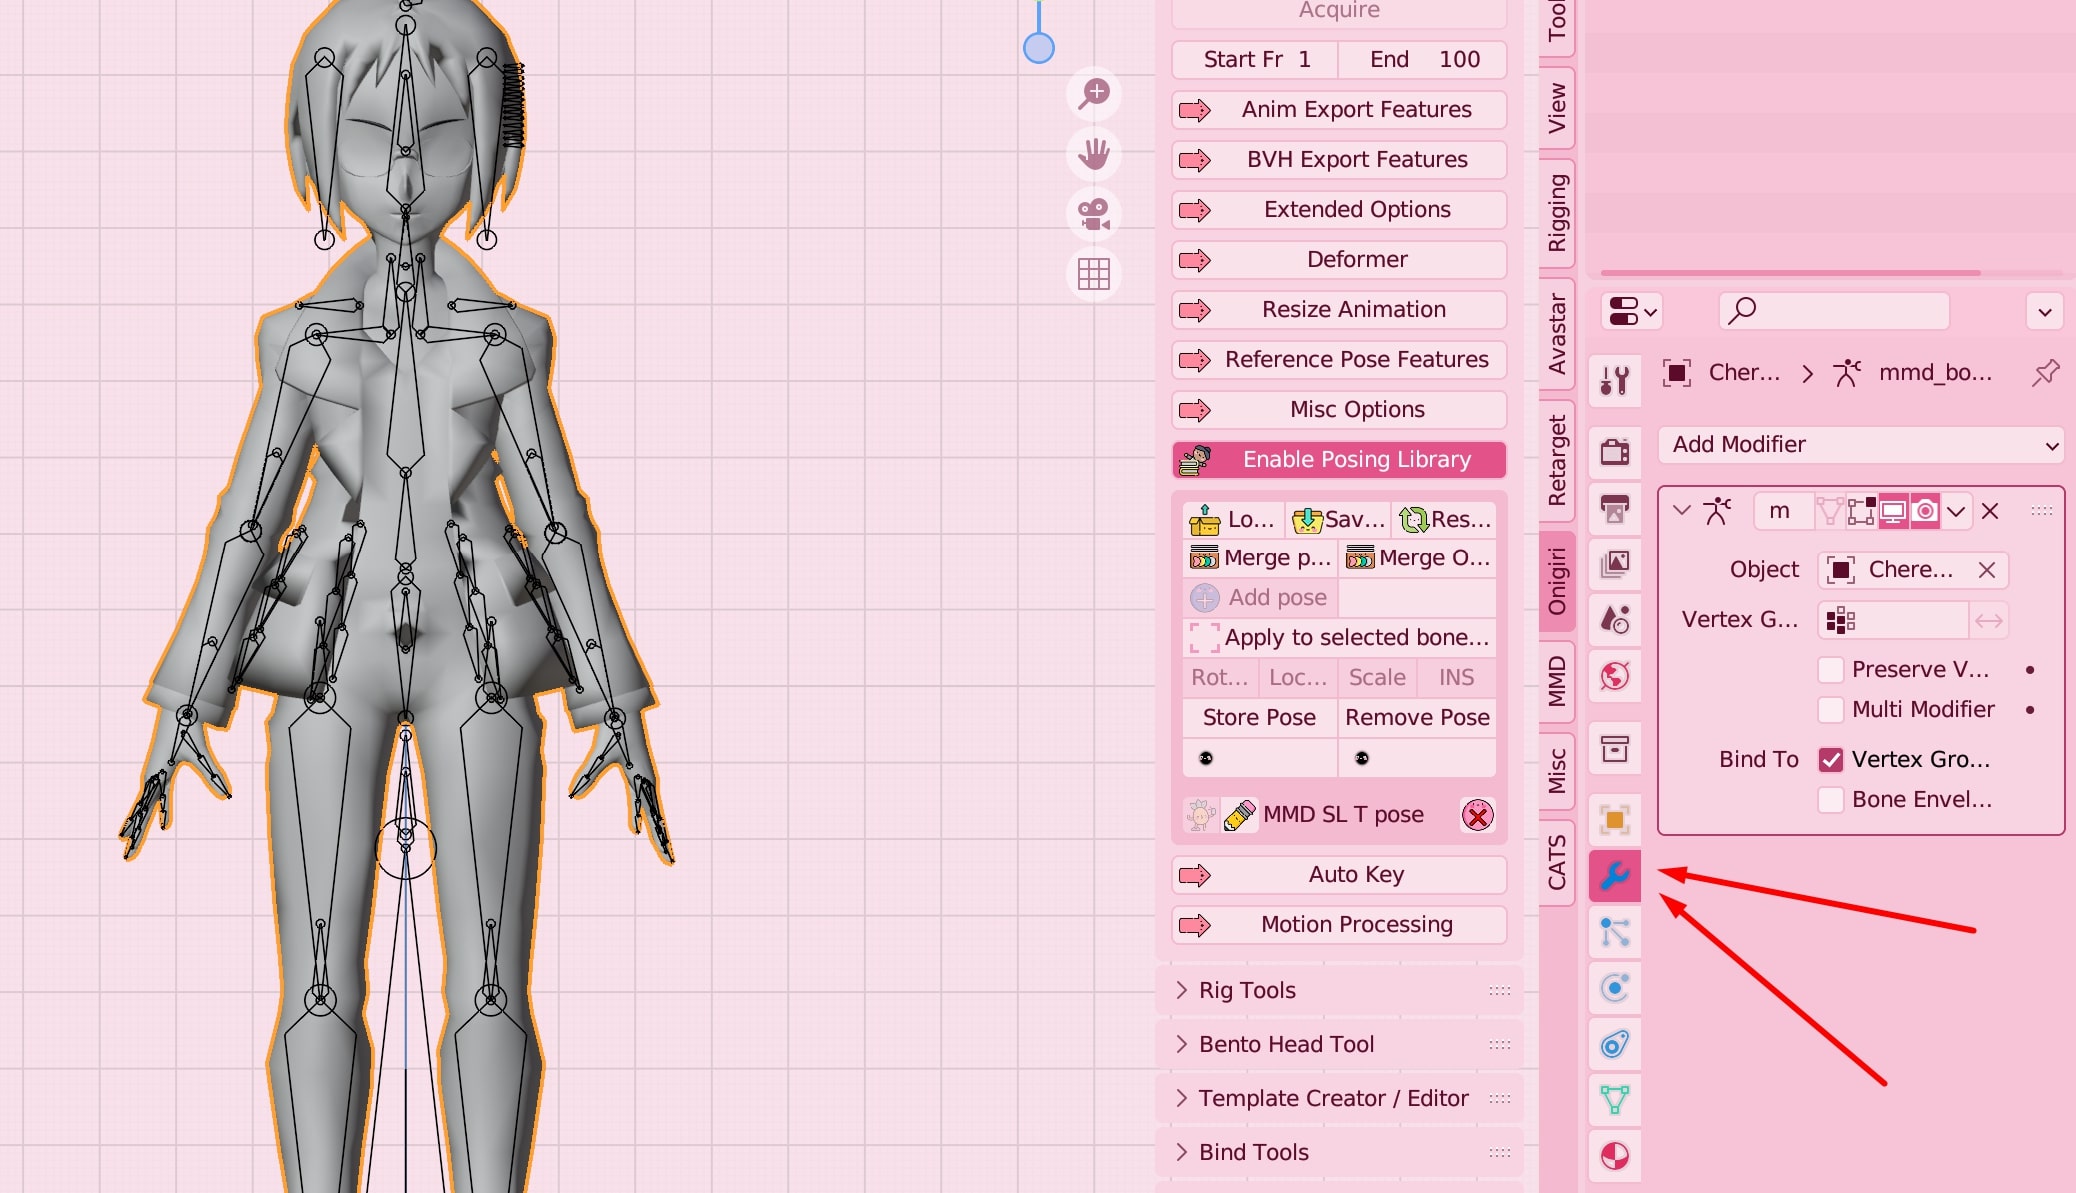
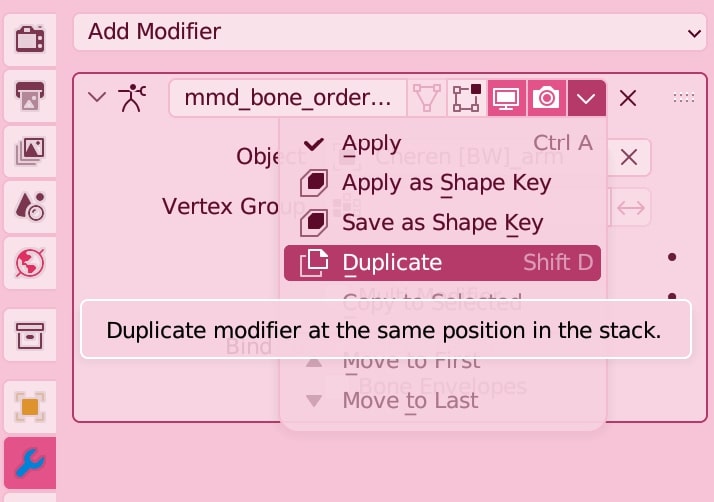
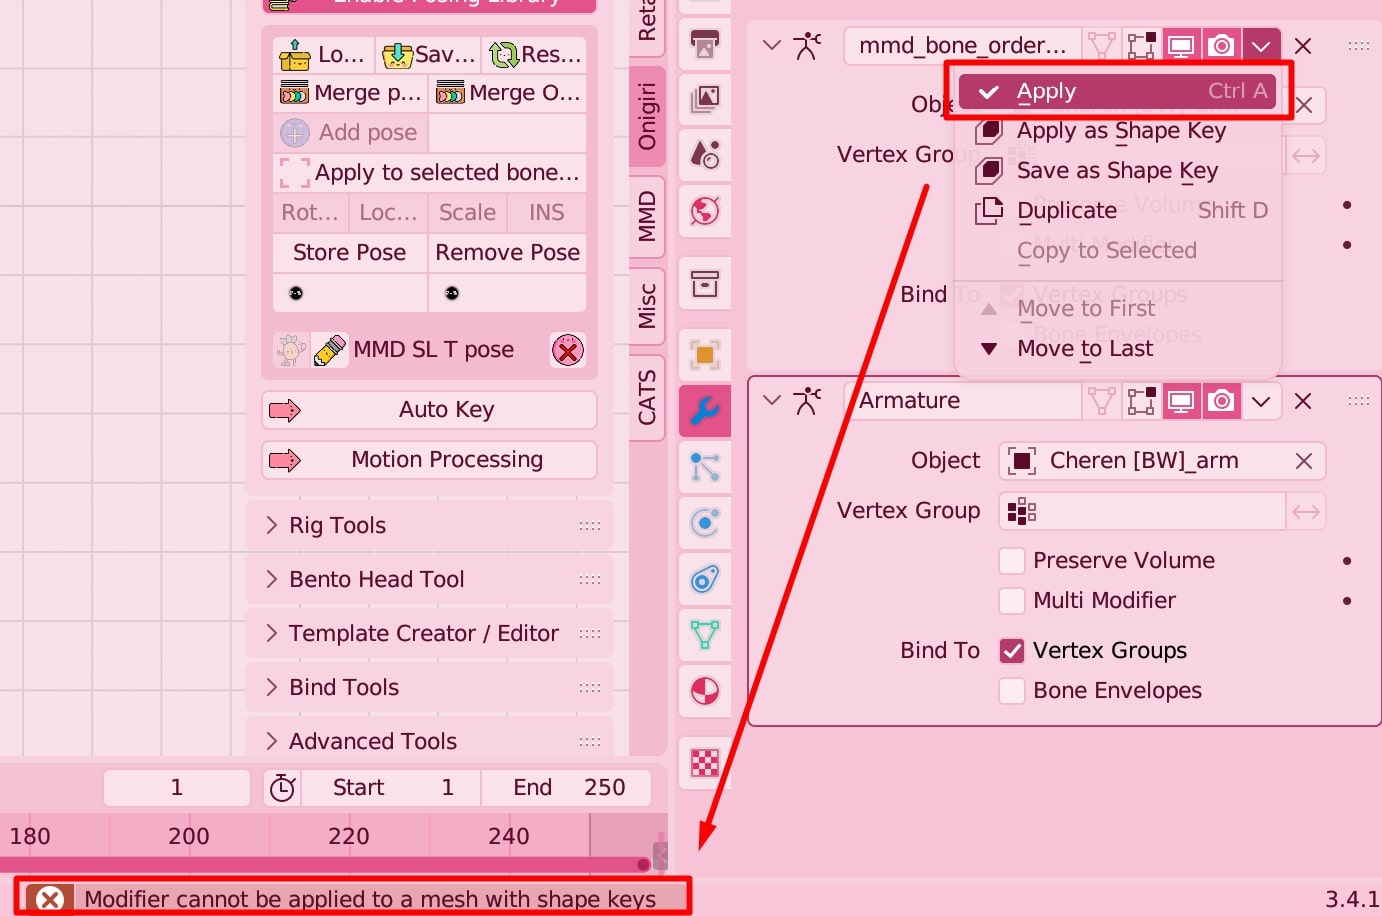
Now the arms will almost certainly warp, which is ok! We're getting there. Try hitting the dropdown arrow again and hit Apply, and you'll get an error about shape keys. We'll fix this now.
Go to the green triangle under the wrench a bit. You'll see a bunch of shape keys; You need to delete them all by hitting the dropdown arrow and Delete All Shape Keys.
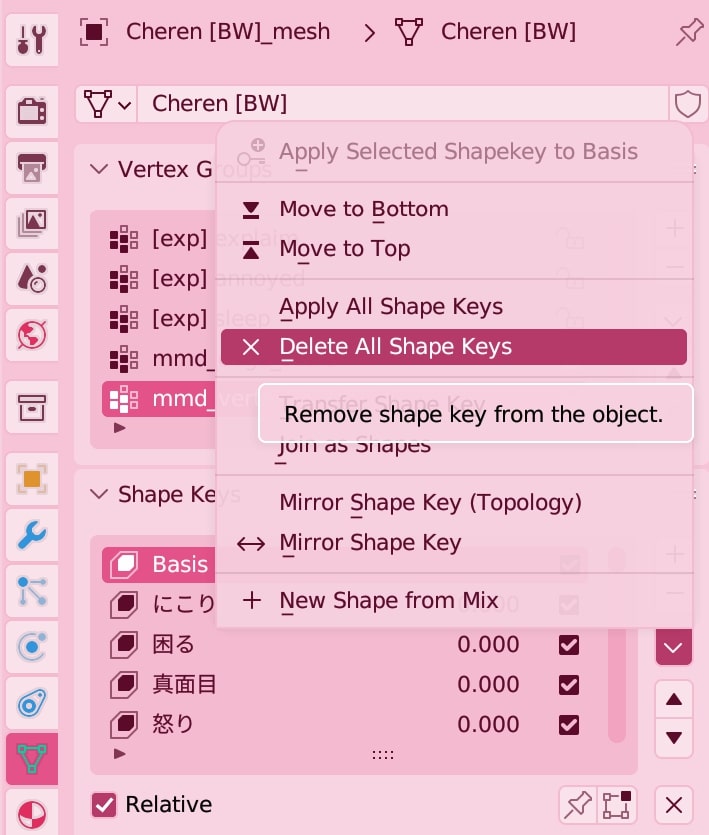
Now, go back to the wrench icon, and apply the first modifer. It won't look like anything happened, but I assure you it worked.
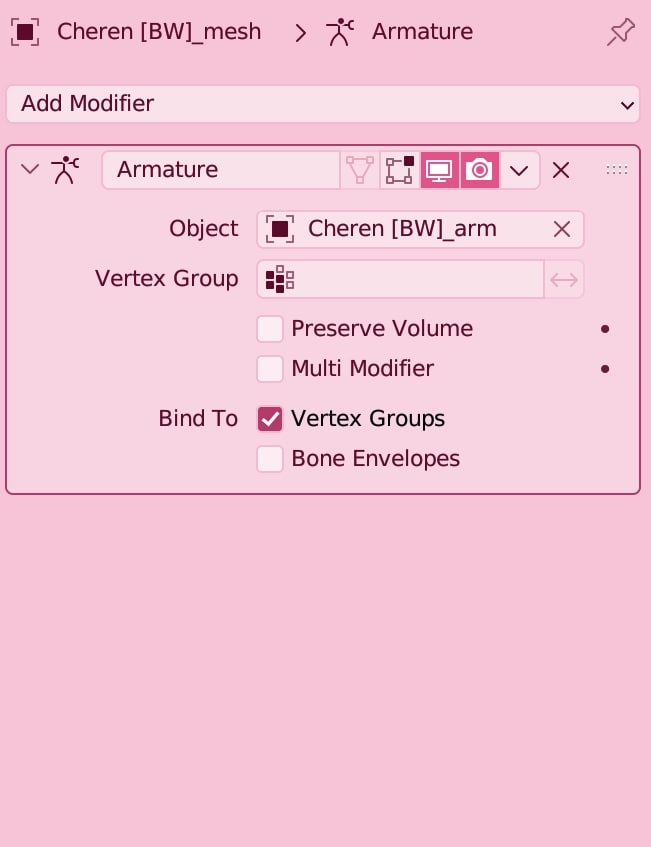
Select the bones once again, and enter Pose Mode with Tab.
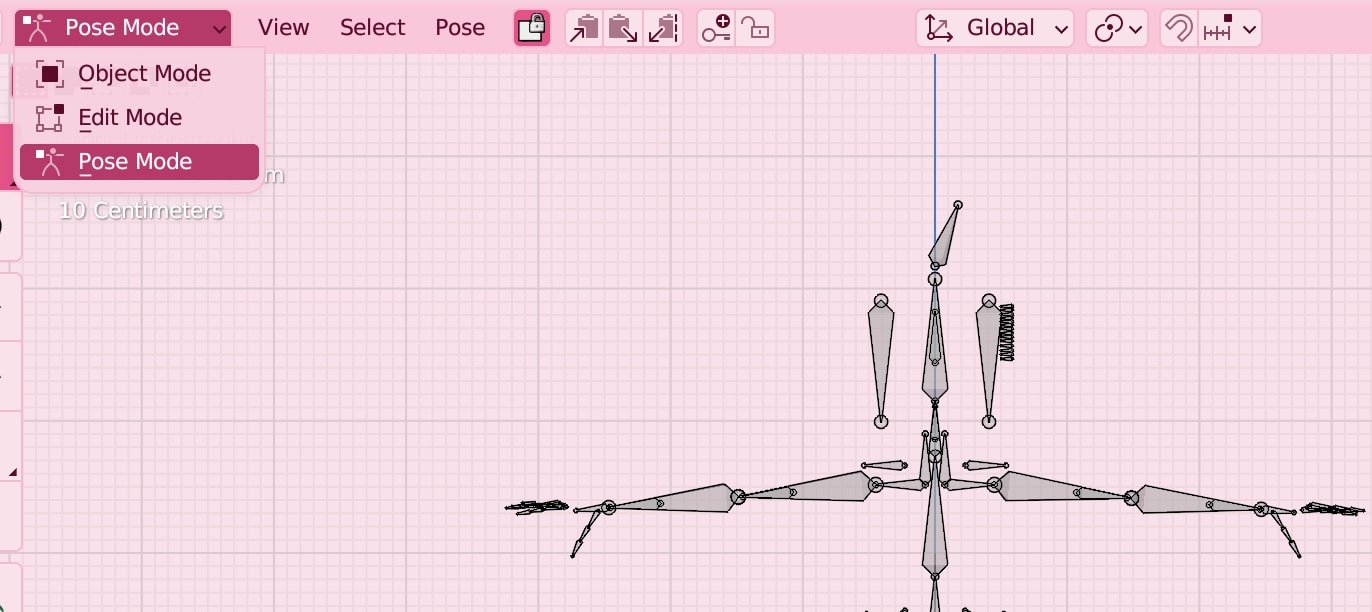
Then, go to the Pose dropdown, and select Apply, then Apply Pose as Rest Pose. The arms will now be in the correct position!

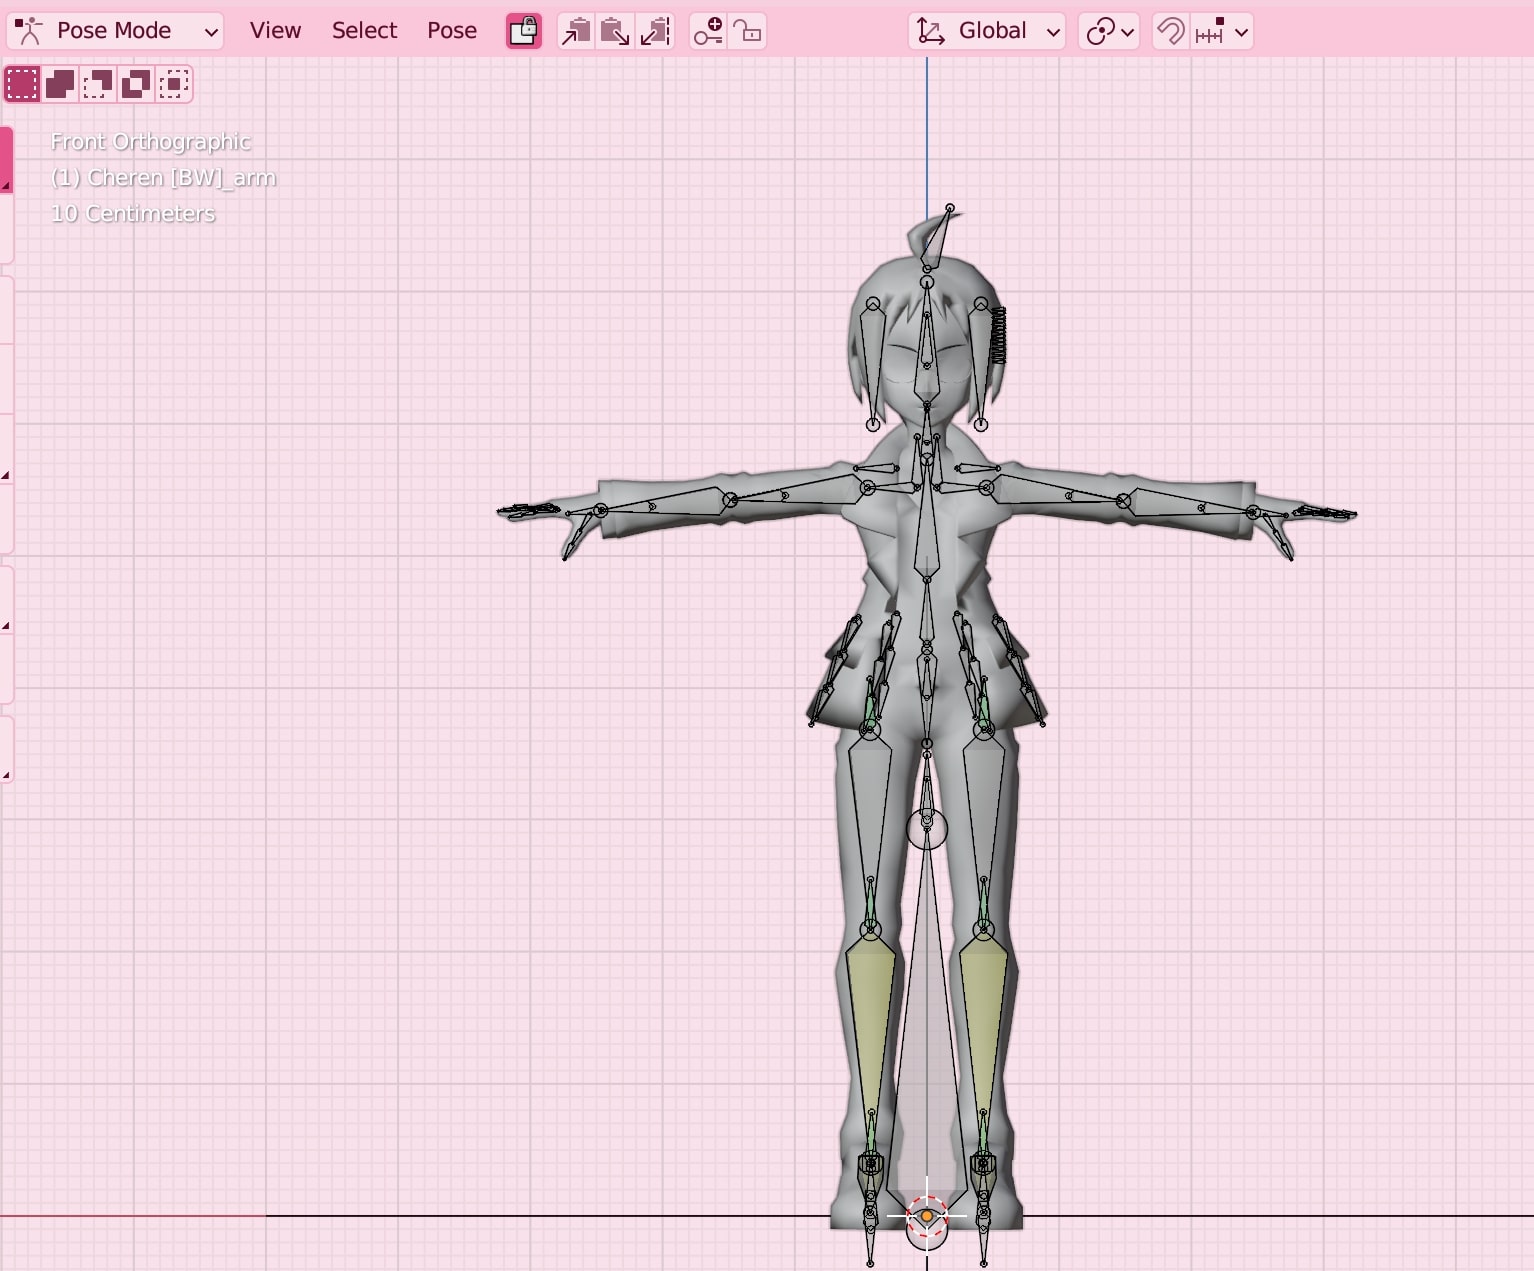
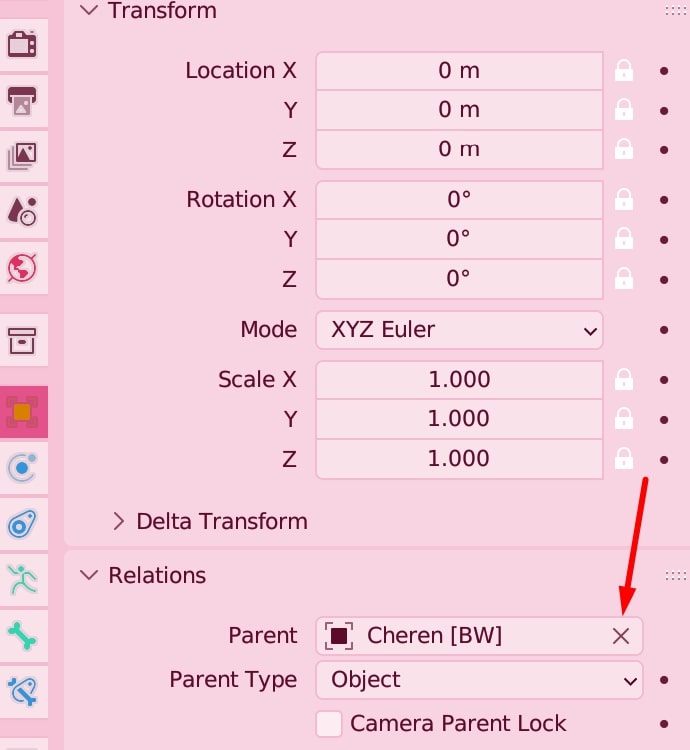
Now, go back to Object Mode with Tab. With the bones still selected, go into the orange square icon on the side menu, and find the Relations dropdown. Hit X to delete whatever the Parent relation is.
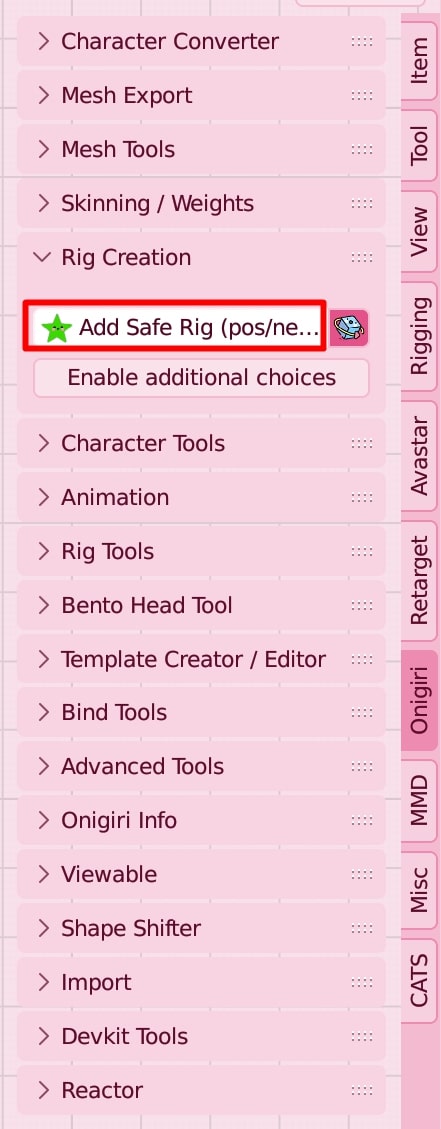
You'll want to navigate to the Onigiri pop-out menu again, and hit Add Safe Rig.
This will add an SL rig for size reference; It usually looks quite tiny, but only because the MMD models are so large.
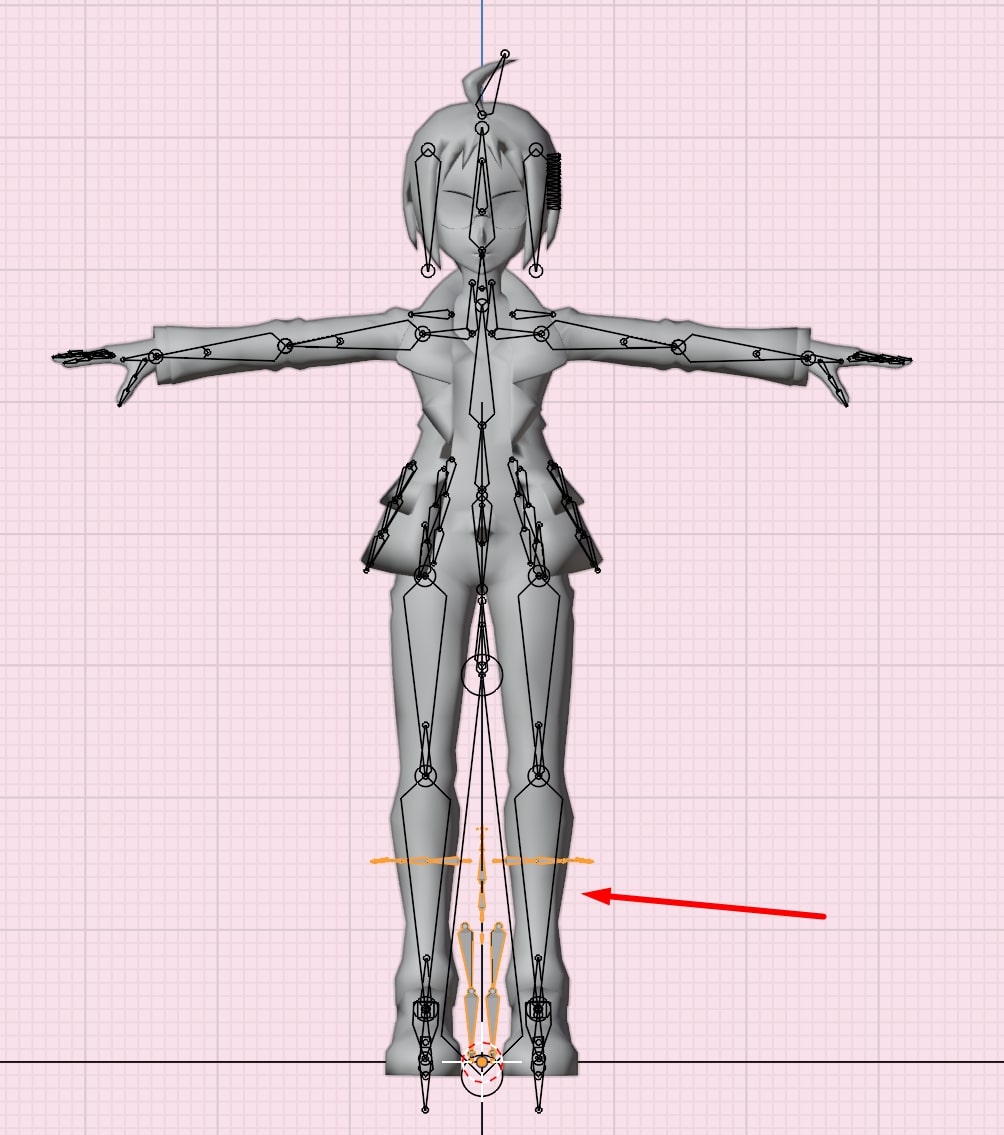
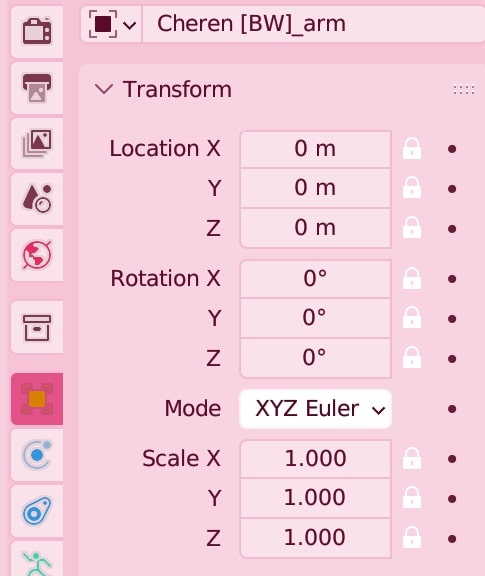
To scale the model down to the appropriate size, select your MMD model's bones, and click and drag down the locks to unlock the deformers. Then, scale the skeleton down with S.
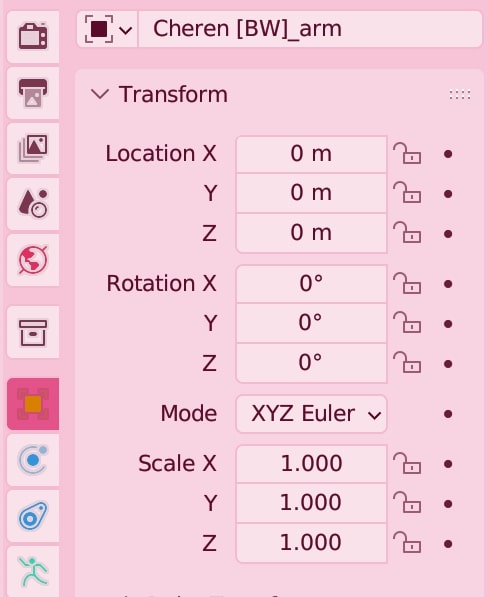
Delete the safe rig, and select the MMD model's bones once more. Go to the Character Converter dropdown in the Onigiri pop-out menu, and select Load Map. Load the .onim file included, and hit convert. It should convert to the SL skeleton!
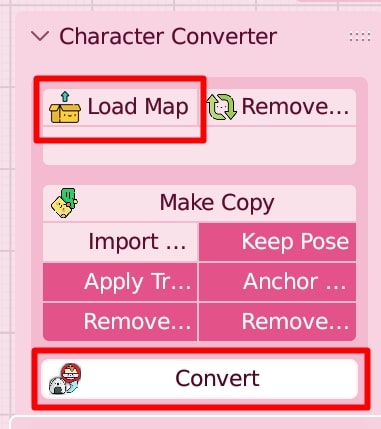
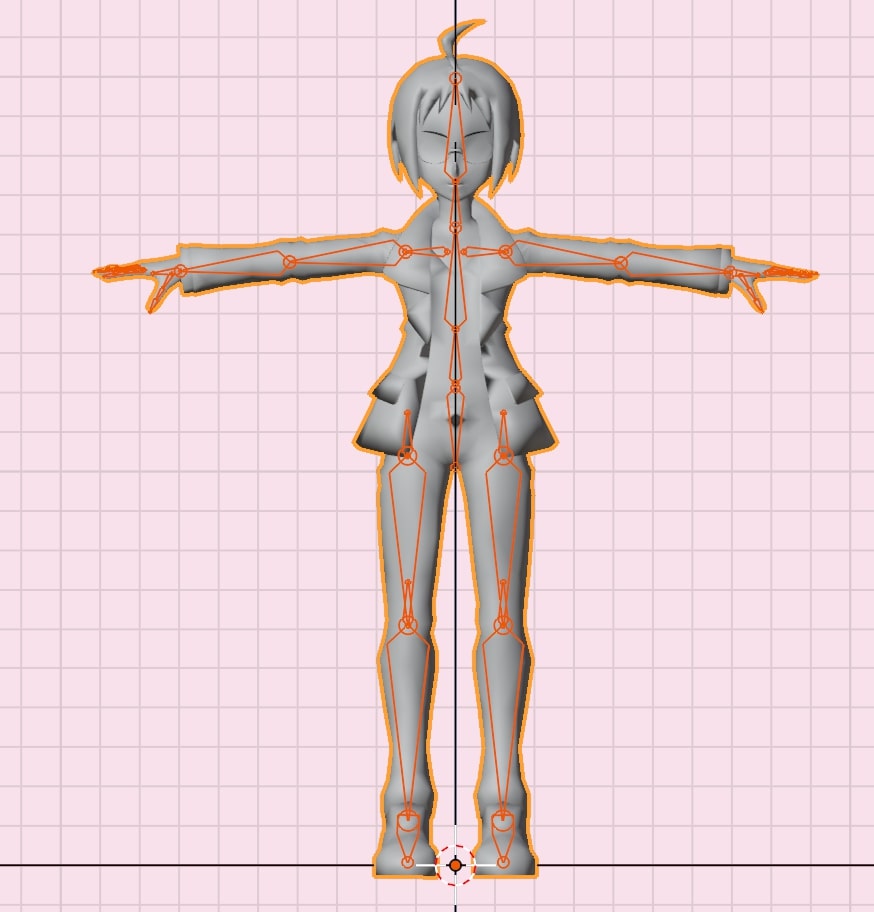
Before you export, you'll want to test your rigging, mainly the legs; I've found that if a character has any kind of coat or long shirt, it might refuse to rig your legs entirely. I don't have a workaround for this besides manually weight painting, my apologies. You can test this in Pose mode.
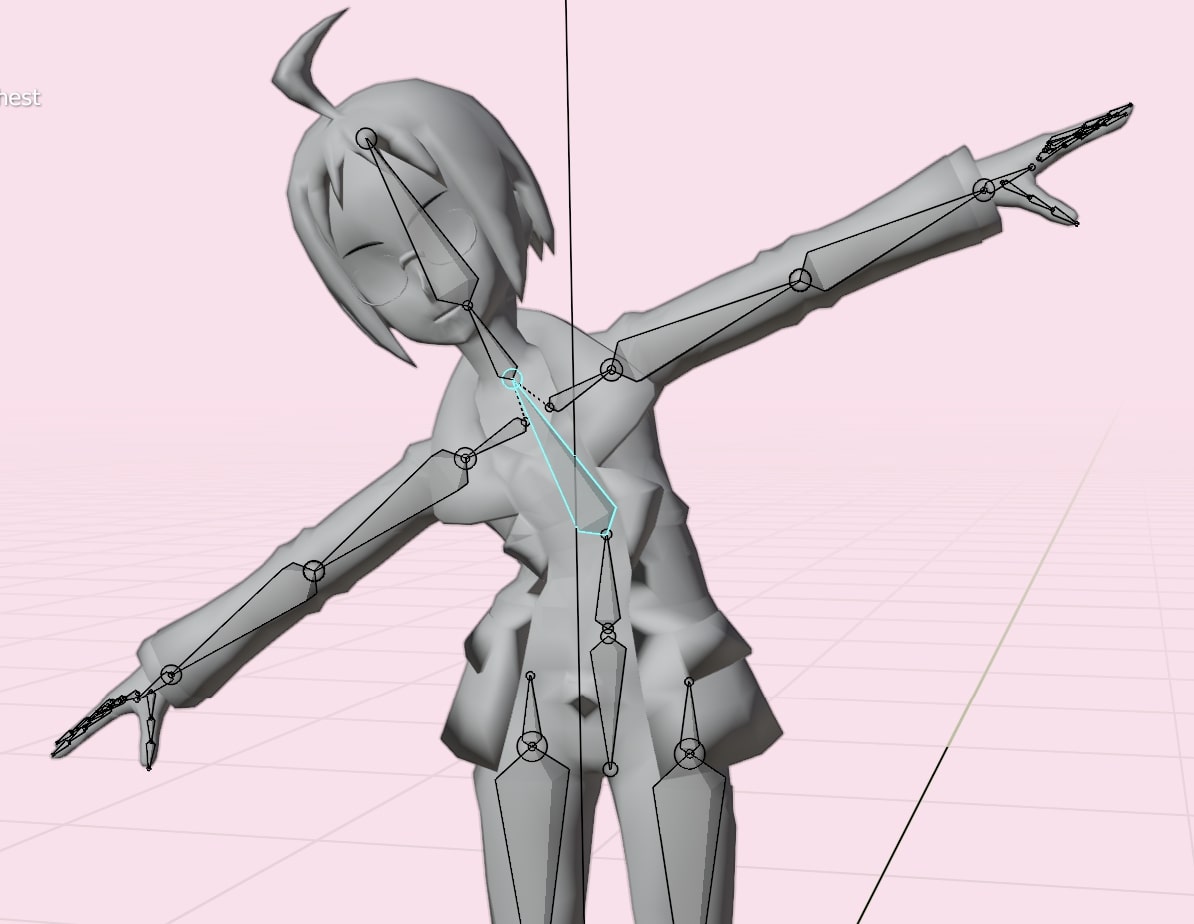
Cheren seems to be bending just fine, so he is ready to export.
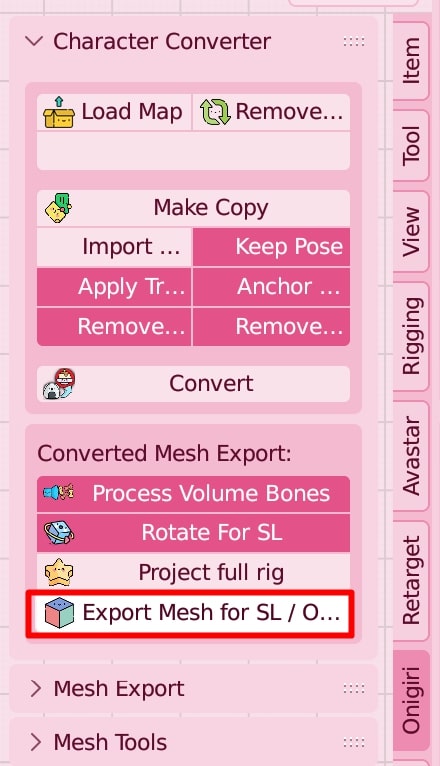
Select the mesh in Object mode, and under the Onigiri pop-out menu, select Export Mesh for SL/Opensim. This will export the rigged .dae model file for you to upload to SL.
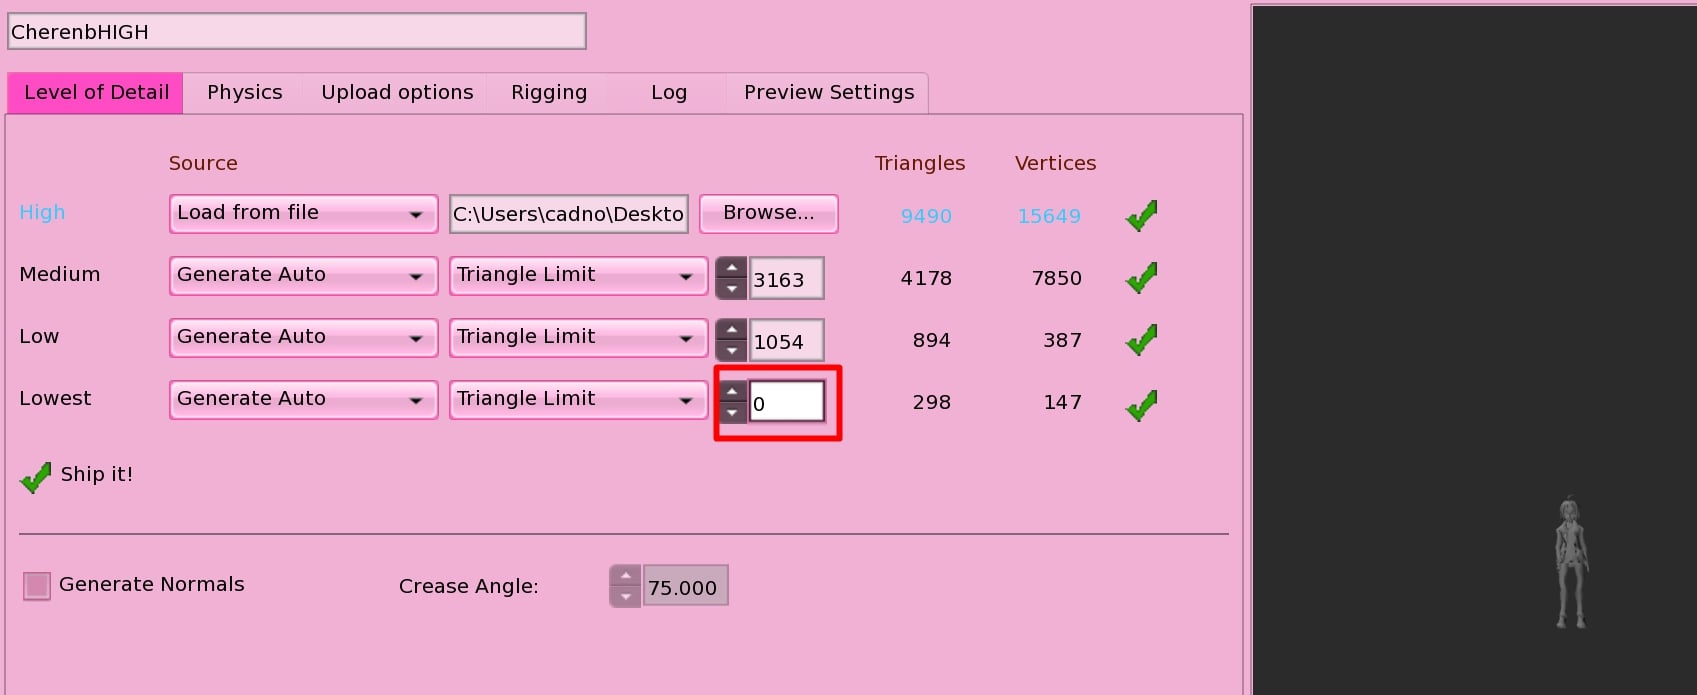
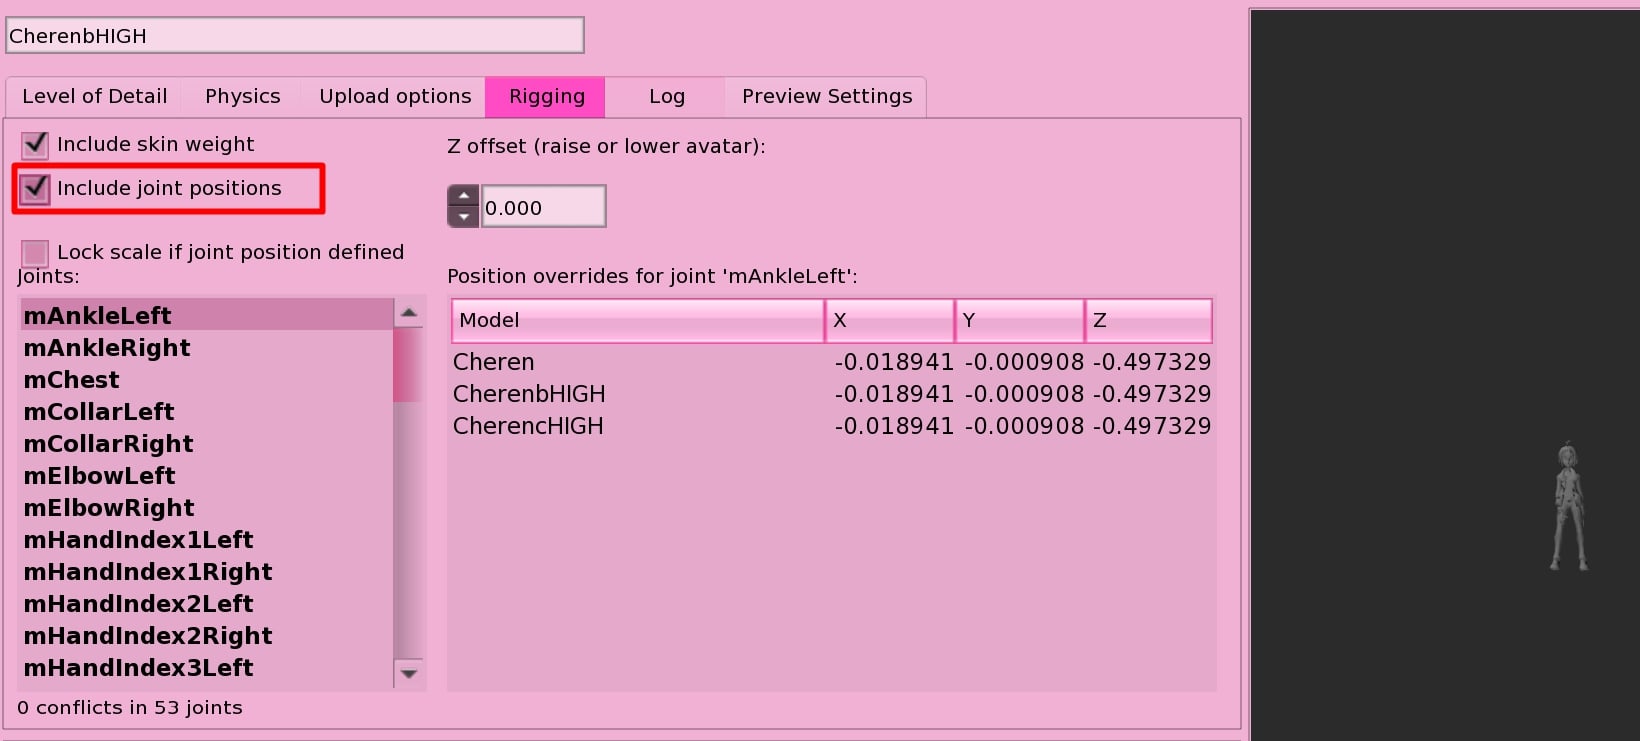
Now, open SL and try uploading the mesh (I find this method hard to test in Local mesh uploads, but I think it's possible). Make sure to upload with the lowest triangles set to 0, and under the Rigging tab, include joint positions. Then, hit calculate weights and fees and upload!
Cheren came out great, but needs some textures. Make sure to wear a full body alpha to hide the default body, too.
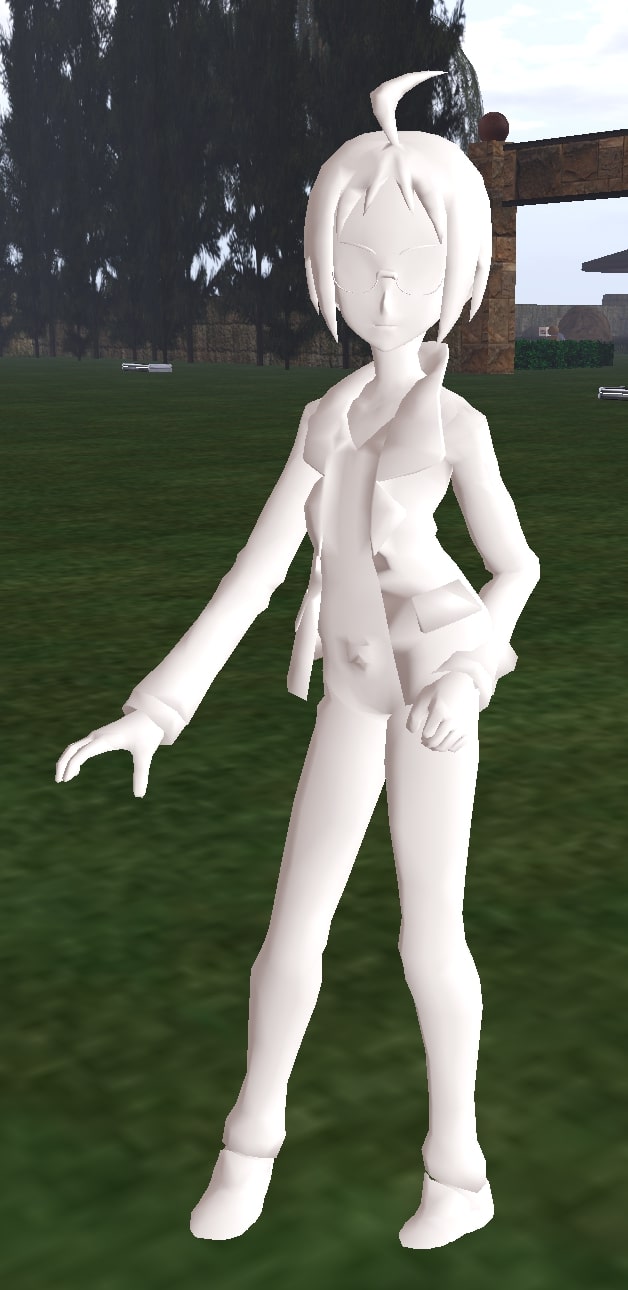
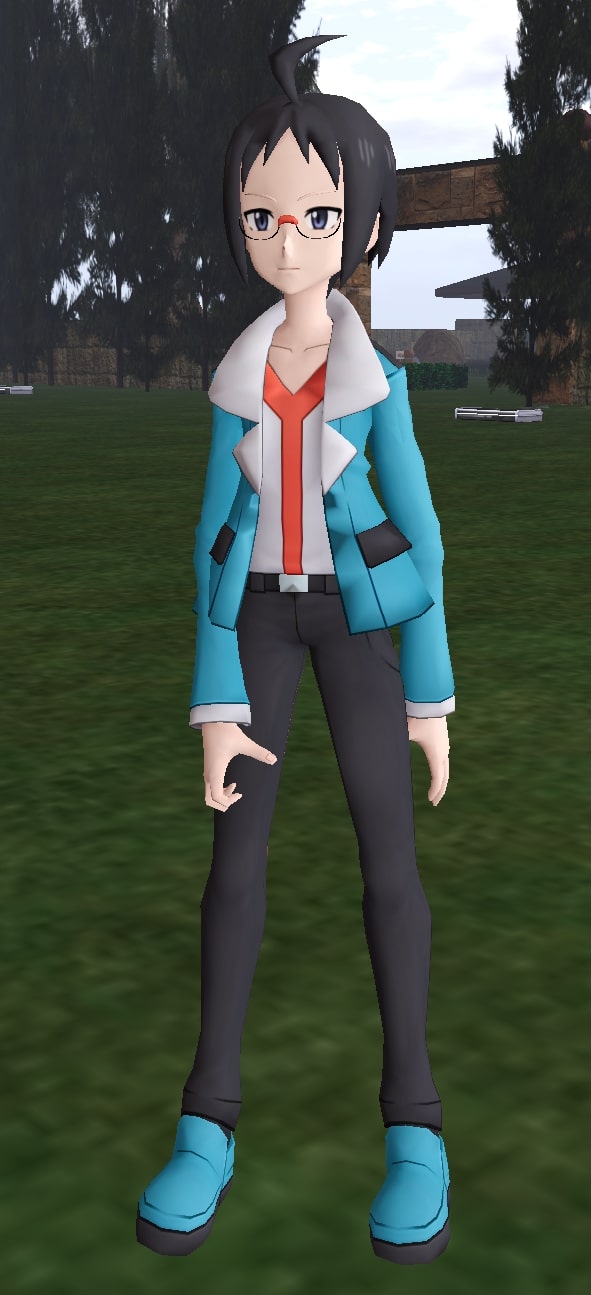
Now, with textures, you're all set! Enjoy your brand new fully rigged avatar :D
Thank you again, Zero, for this excellent tutorial.
HOME
This is an abridged version of Zero/The Mighty Ginkgo's tutorial for converting MMD models into SL. Please refer to the original tutorial for an in-depth video process for conversion. I've simplified it into this written format to streamline the process for those who are already experienced with Blender and Avastar, and also show it on a more modern version of Blender; I am using 3.4 with the pink theme found here in the screenshots.
This tutorial most likely isn't very beginner friendly, although I will say it was my first serious foray into Blender. It requires Avastar, Onigiri, CATS, and a few pose models for conversion/loading. It also requires a model to convert: I'll be converting Cheren from Pokemon Black and White's MMD rigged model from Pokemon Masters for this tutorial, found here. You can get the pose files, CATS, and Onigiri here as they were provided by Zero, but not Avastar. The .zip file is safe to download; I compressed it myself.
If you haven't already, begin by installing your add-ons (Avastar, CATS, and Onigiri). You do this by navigating to Preferences under Edit, then the Add-ons button, then hit Install to navigate to the .zip files.
When you have them uploaded to Blender, you enable them by checking the checkmark box. Restart Blender after this.
With your add-ons installed, you will now be able to import .pmd and .pmx models, which are MMD model files. Click this and navigate to your MMD model, which should import neatly, rigging and all.
Unfortunately, Cheren is in an A-pose, which while being the default pose for MMD, is not for SL.
So, we have to convert him with one of the files included in the MMD2SL .zip. Select (left click) the model's bones, open the pop-out side menu, and select the Onigiri tab. Under these drop downs, select Animations, then Enable Posing Library, and hit load to load the T-pose file. This is the file with the .bpl file type. You might need to try either of them to find which works for you.
Once loaded, the file name will show up at the bottom of the drop down. Hit the happy pineapple icon to load it to the model. Your model's arms might shift.
Now, select (left click) the mesh itself, and on the side menu (modifiers), select the wrench icon. From the little dropdown arrow within this box, hit Duplicate.
Now the arms will almost certainly warp, which is ok! We're getting there. Try hitting the dropdown arrow again and hit Apply, and you'll get an error about shape keys. We'll fix this now.
Go to the green triangle under the wrench a bit. You'll see a bunch of shape keys; You need to delete them all by hitting the dropdown arrow and Delete All Shape Keys.
Now, go back to the wrench icon, and apply the first modifer. It won't look like anything happened, but I assure you it worked.
Select the bones once again, and enter Pose Mode with Tab.
Then, go to the Pose dropdown, and select Apply, then Apply Pose as Rest Pose. The arms will now be in the correct position!
Now, go back to Object Mode with Tab. With the bones still selected, go into the orange square icon on the side menu, and find the Relations dropdown. Hit X to delete whatever the Parent relation is.
You'll want to navigate to the Onigiri pop-out menu again, and hit Add Safe Rig.
This will add an SL rig for size reference; It usually looks quite tiny, but only because the MMD models are so large.
To scale the model down to the appropriate size, select your MMD model's bones, and click and drag down the locks to unlock the deformers. Then, scale the skeleton down with S.
Delete the safe rig, and select the MMD model's bones once more. Go to the Character Converter dropdown in the Onigiri pop-out menu, and select Load Map. Load the .onim file included, and hit convert. It should convert to the SL skeleton!
Before you export, you'll want to test your rigging, mainly the legs; I've found that if a character has any kind of coat or long shirt, it might refuse to rig your legs entirely. I don't have a workaround for this besides manually weight painting, my apologies. You can test this in Pose mode.
Cheren seems to be bending just fine, so he is ready to export.
Select the mesh in Object mode, and under the Onigiri pop-out menu, select Export Mesh for SL/Opensim. This will export the rigged .dae model file for you to upload to SL.
Now, open SL and try uploading the mesh (I find this method hard to test in Local mesh uploads, but I think it's possible). Make sure to upload with the lowest triangles set to 0, and under the Rigging tab, include joint positions. Then, hit calculate weights and fees and upload!
Cheren came out great, but needs some textures. Make sure to wear a full body alpha to hide the default body, too.
Now, with textures, you're all set! Enjoy your brand new fully rigged avatar :D
Thank you again, Zero, for this excellent tutorial.
HOME
