01: The Basics and UI
This is the longest part of my tutorial, as it is an in-depth explanation of all relevant aspects of Second Life's UI and navigation a beginner could need. Please refer back to this page if you forget what a given button does, or how to change a given setting. Let's begin!
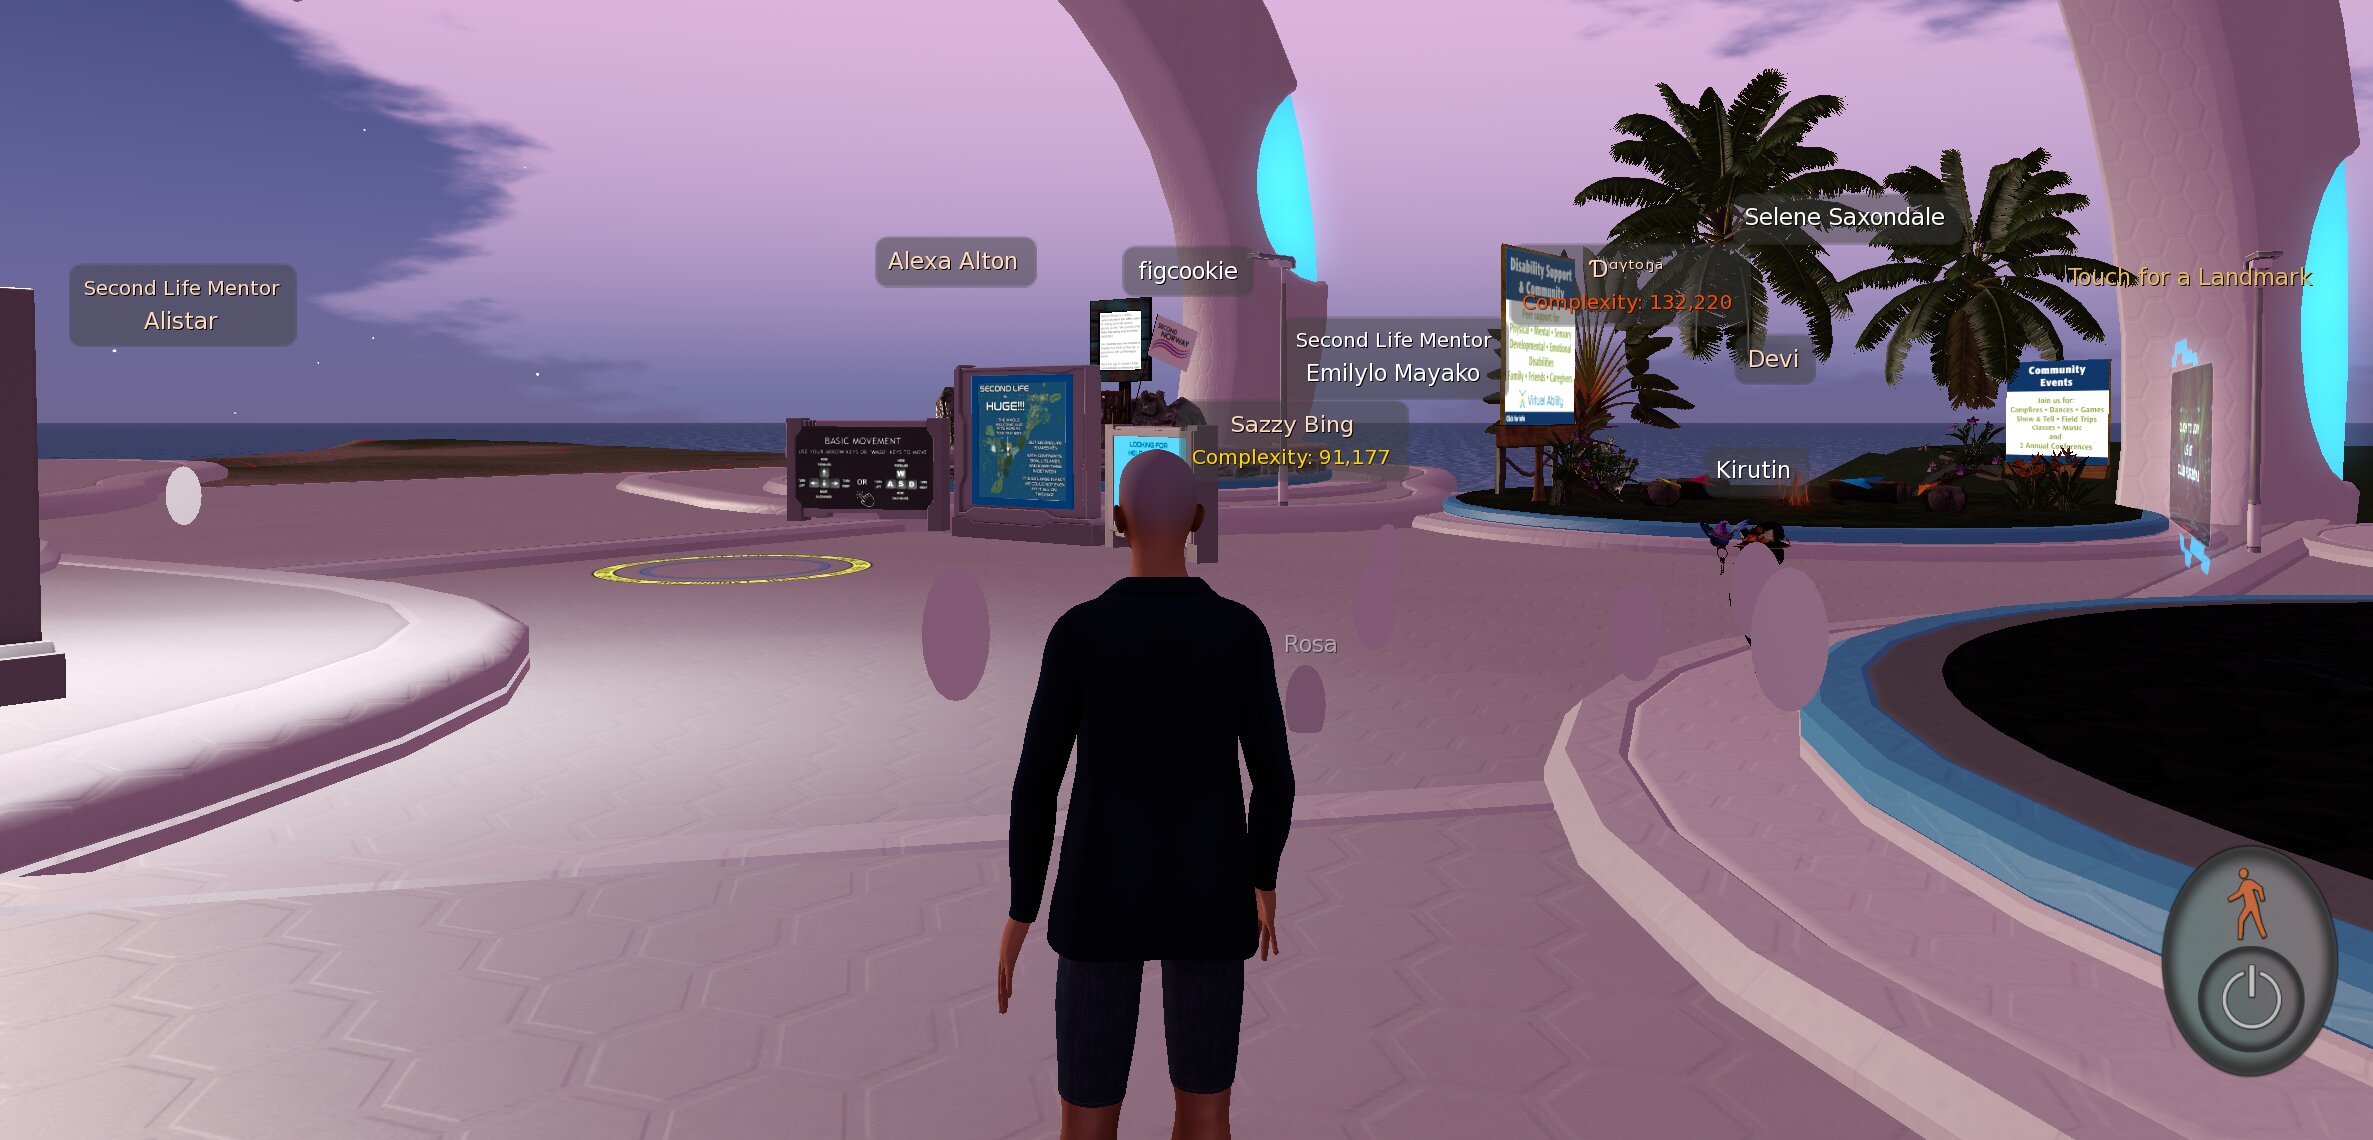
When you first login, you'll begin at an area called a welcome hub. It should look something like this, with many other players who have just created an account. You'll see that usernames, display names, and group titles are all located above the heads of people's avatars, including your own (You'll be able to change/set the latter two in a bit). Before an avatar loads in entirely, it will appear as an orange cloud or as a white "egg", like in the screenshot.
Let's change some settings to make SL run better and make your experience easier. They are not necessary to playing, but they are what I use all the time (and for the purposes of this tutorial), and I will explain why they are set this way as I go. Hit CTRL+P or go to Avatar > Preferences at the top left of your screen.
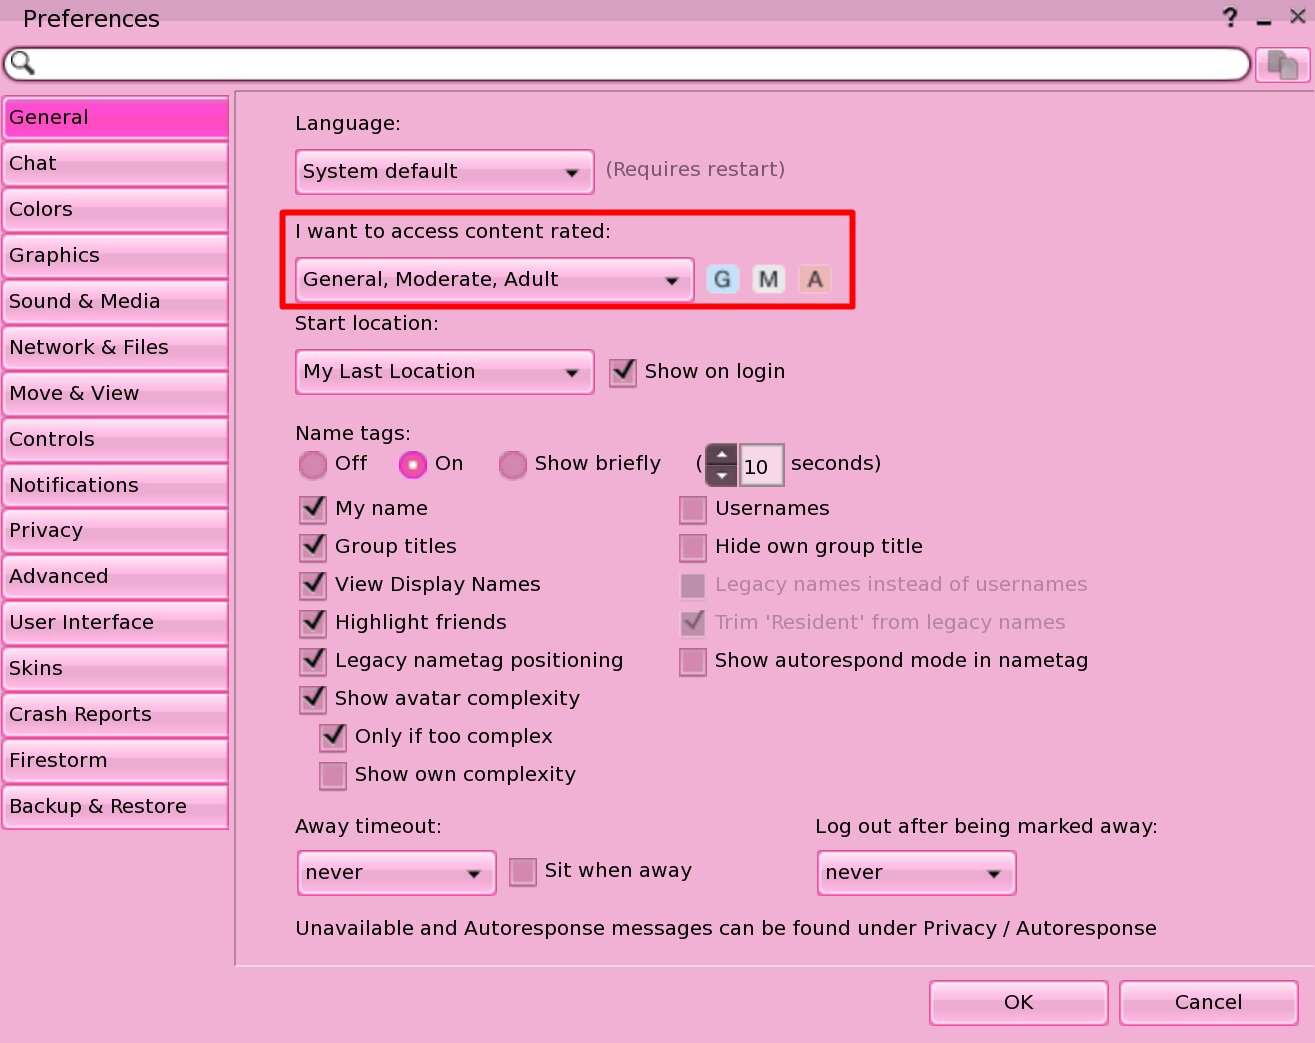
Under General, select "General, Moderate, Adult" for what content you want to access. This does not necessarily mean you want to access NSFW content, but that you will be able to go to any region regardless of censorship rating, including those marked "Adult" without explicit NSFW content visible.
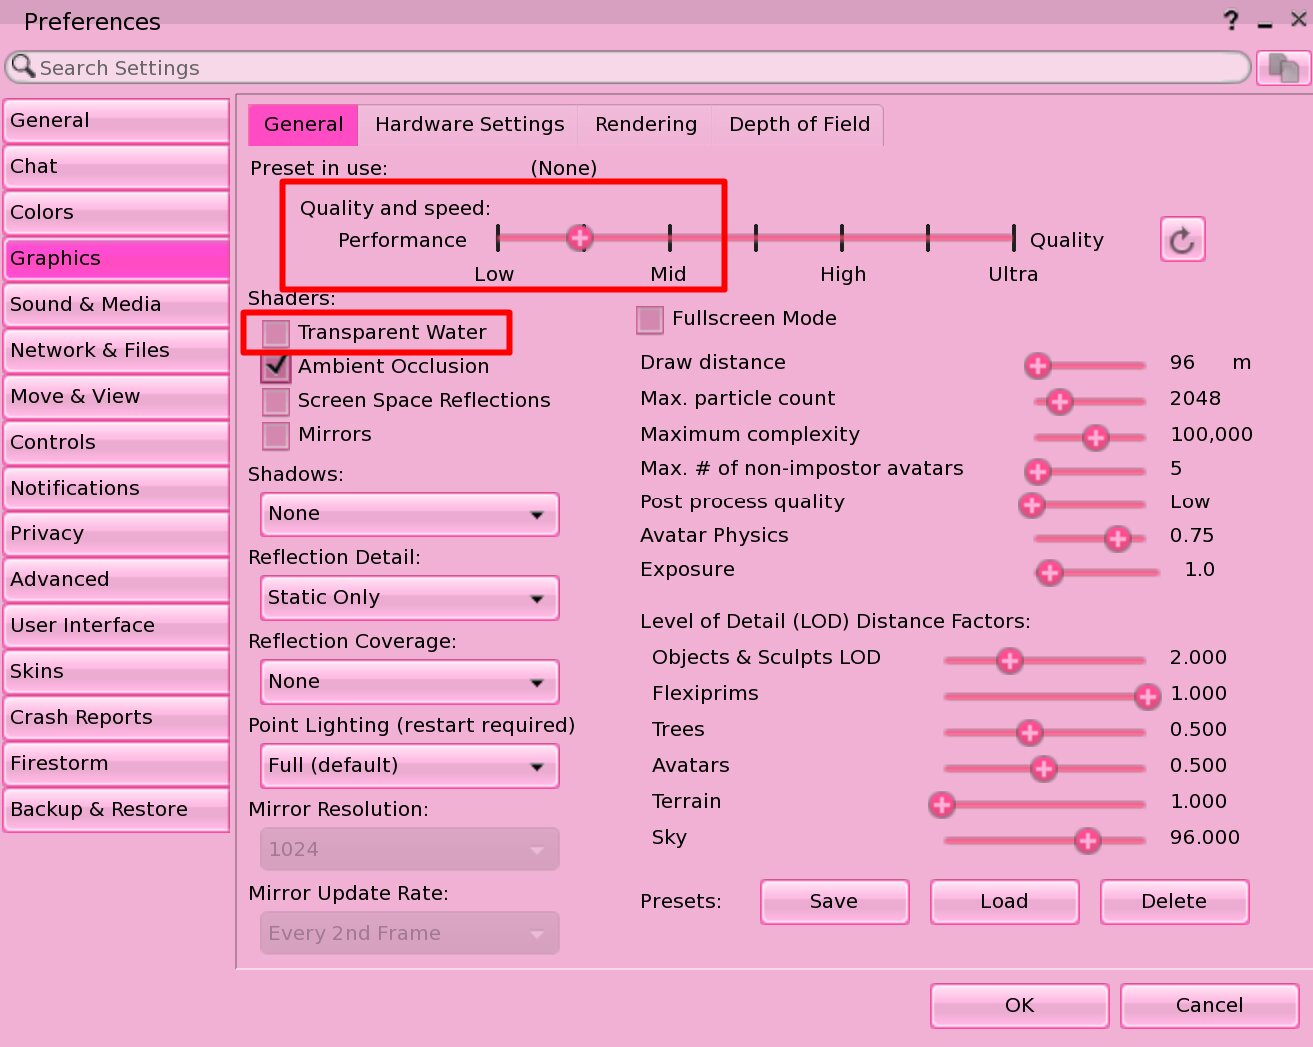
Under Graphics, set the preset slider to between "Low" and "Mid". Uncheckmark "Transparent water". These settings are to ensure SL runs smoothly on many lower end computers, but you can turn up the graphics if your computer is good. Ultimately, SL is extremely old and not well optimized, so most computers will get hot and chug along...
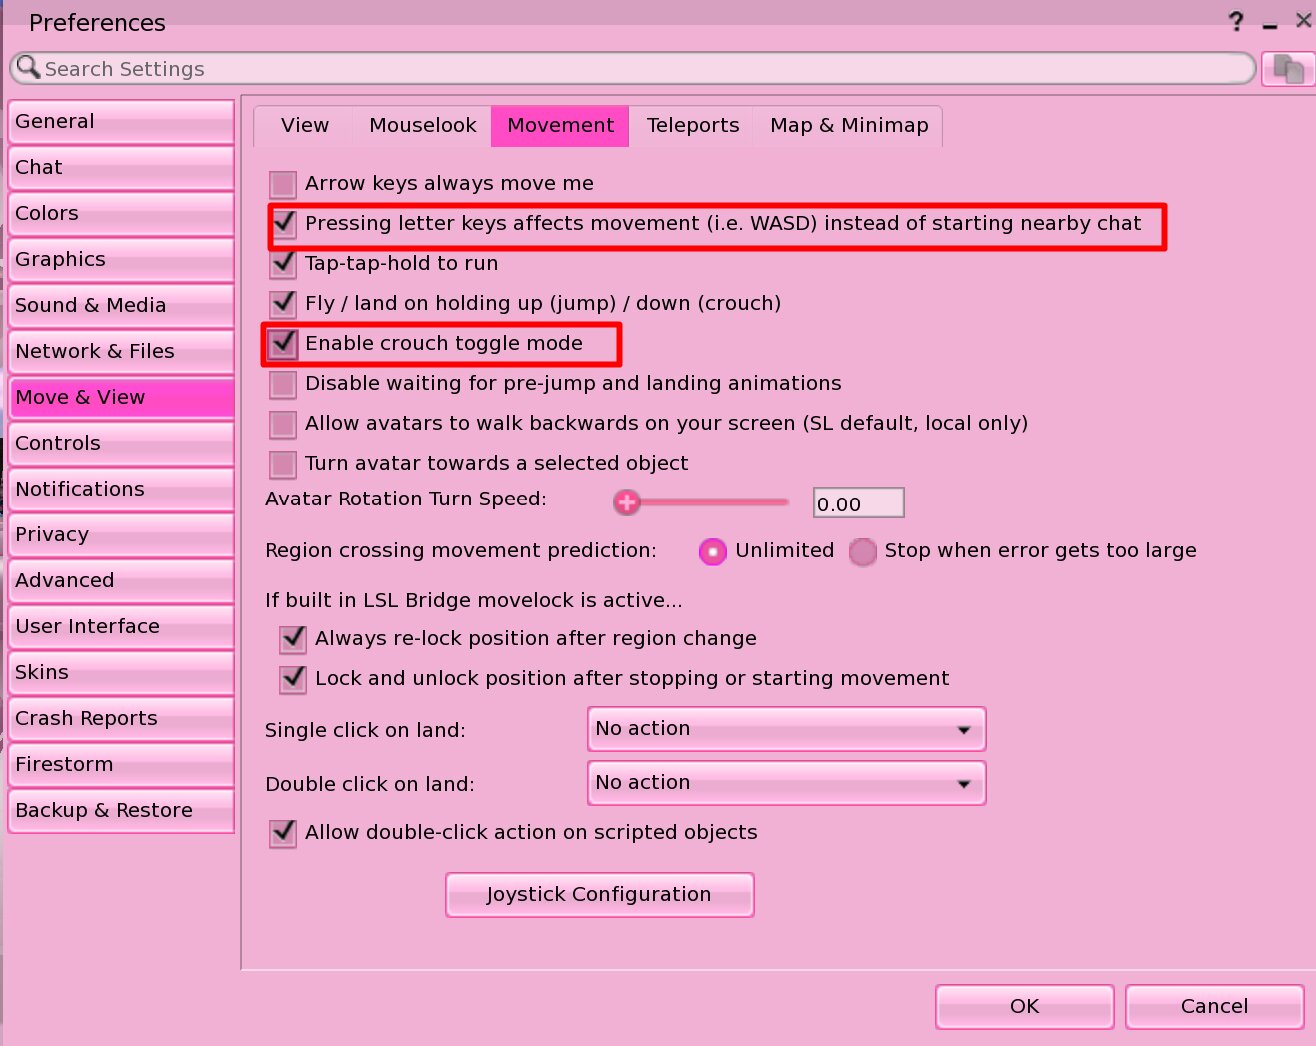
Under Move & View > Movement, checkmark "Pressing letter keys effects movement (ie. WASD)" and checkmark "Enable crouch toggle mode". Moving with WASD is the most common question I get when making an SL tutorial, and this will be most helpful for moving like a modern video game.
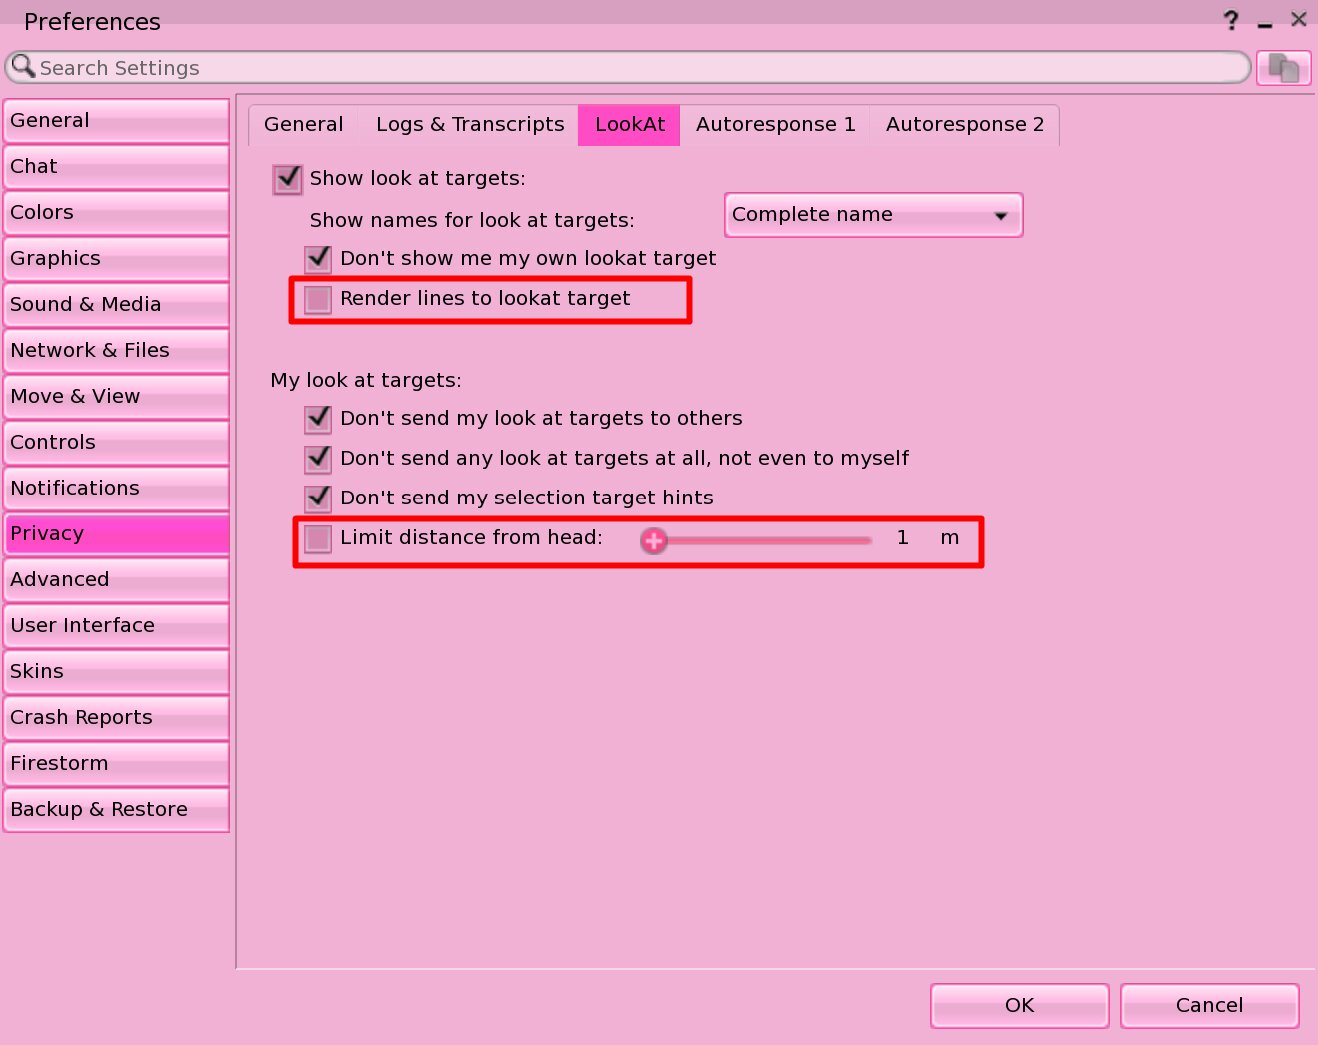
Under Privacy > LookAt, Checkmark everything except "Render lines to lookat target" and "Limit distance from head". In SL, A lookat target or crosshair is where someone's camera is positioned. It is helpful to turn these off because, to be blunt, There are some SL users will get mad at you if they see your crosshair looking at them, even if it's unintentional. So, this helps avoid that issue.
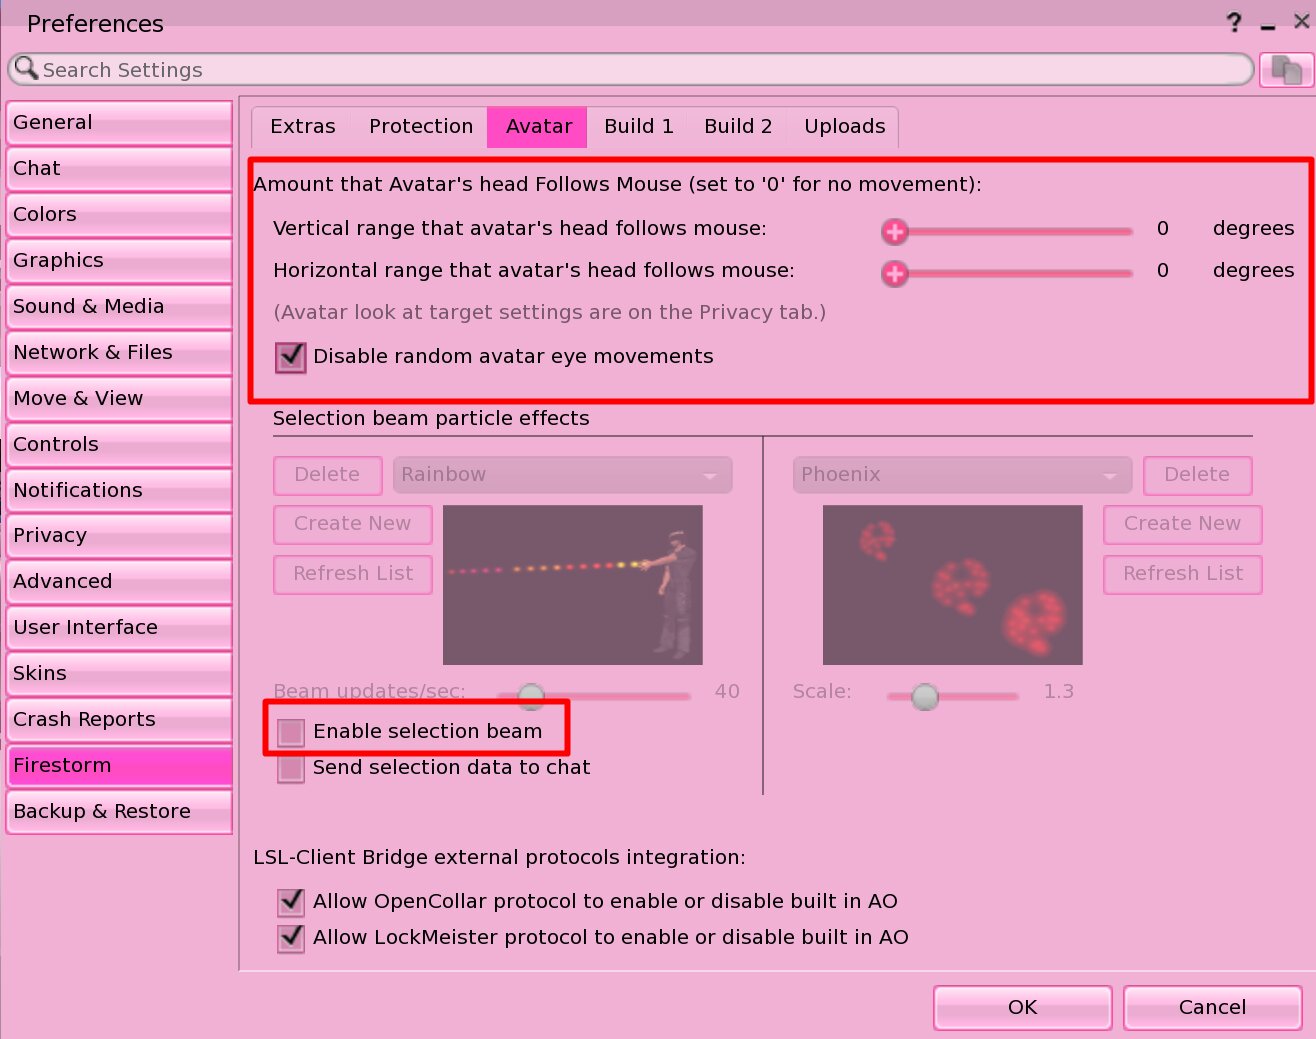
Under Firestorm > Avatar, Set the vertical and horizontal range of your avatar head movement to 0. Checkmark "Disable random avatar eye movements", and uncheckmark "Enable selection beam". This will make your avatar stay in place when you interact with things, and not emit a selection beam.
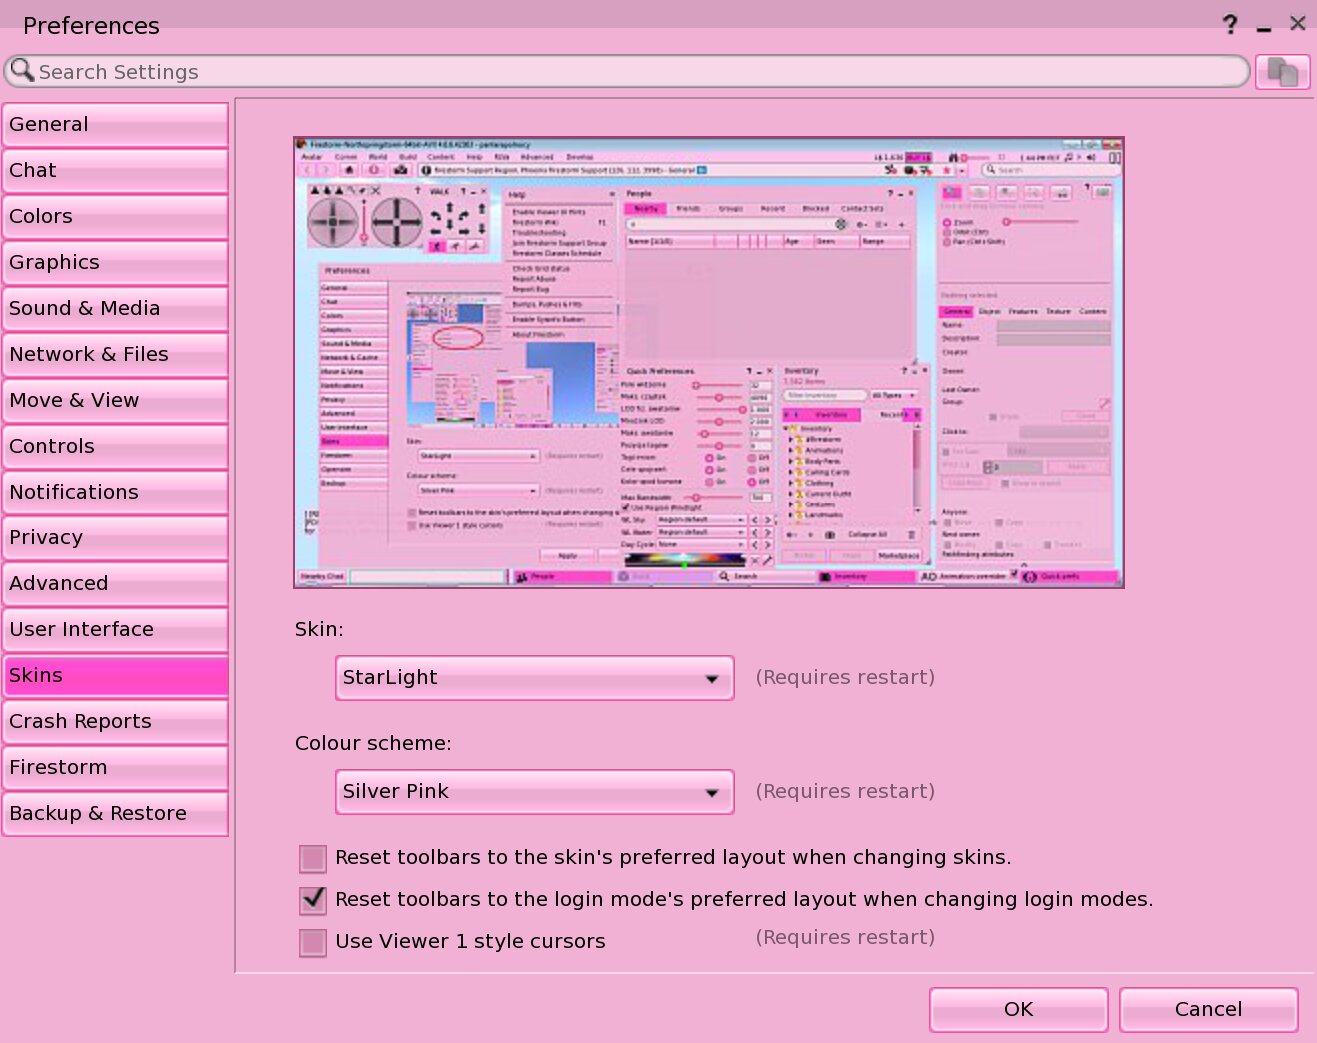
Additionally, under Skins, I use the Starlight Silver Pink skin for my UI. Choose one to your liking, as 99% of this tutorial will work regardless of the skin chosen.
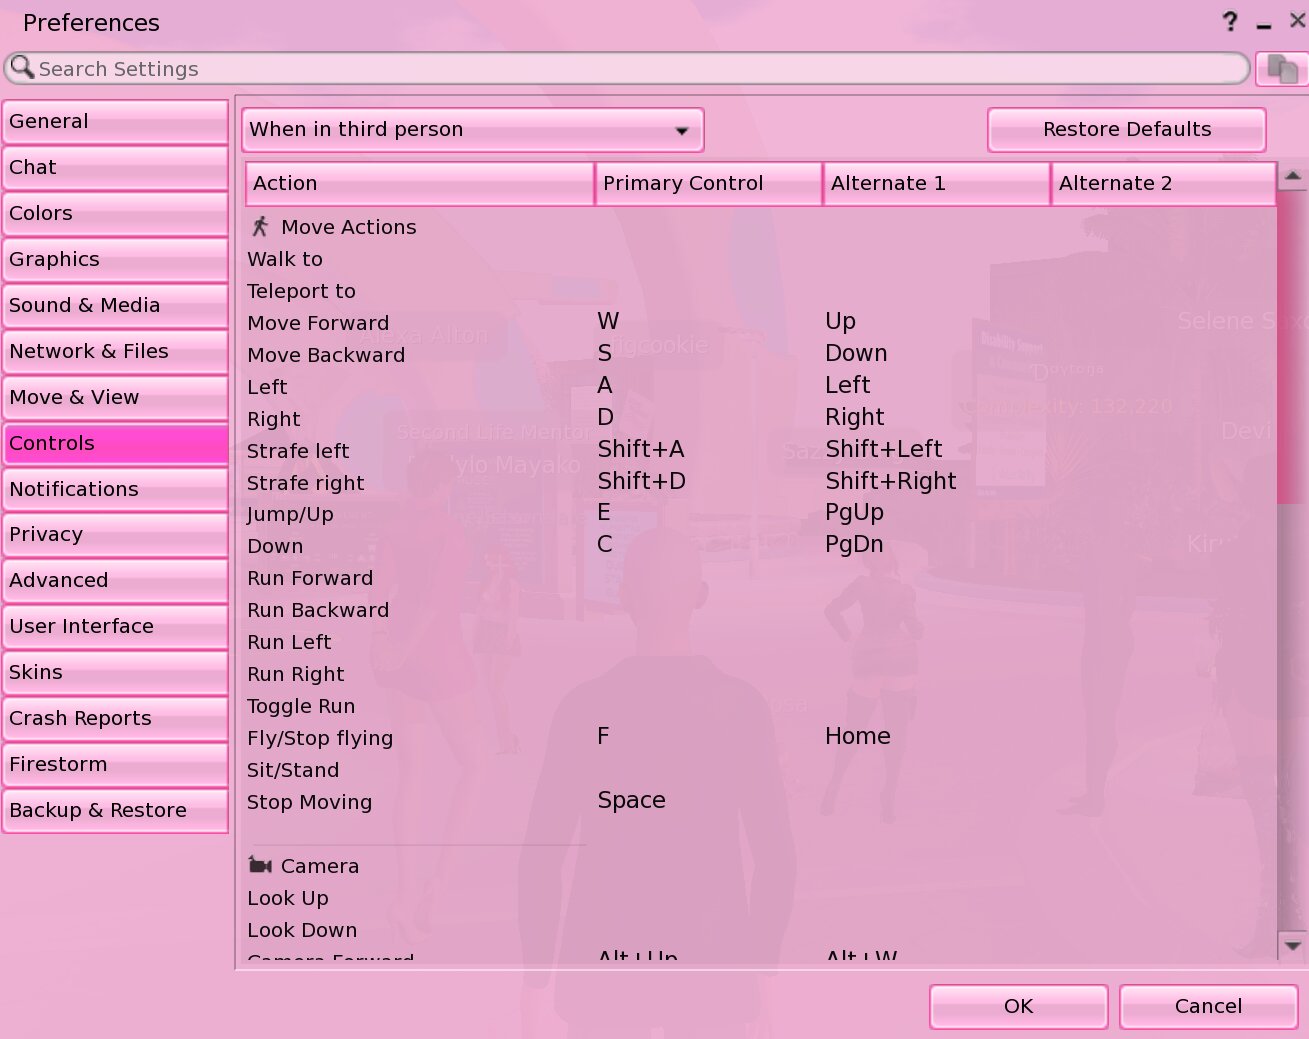
Finally, all keys in SL can be rebound under the Controls tab. This tutorial assumes you use the default controls.
Once these settings are in place, I'm going to show you your toolbar. It should look something like this, and has the following items from left to right:

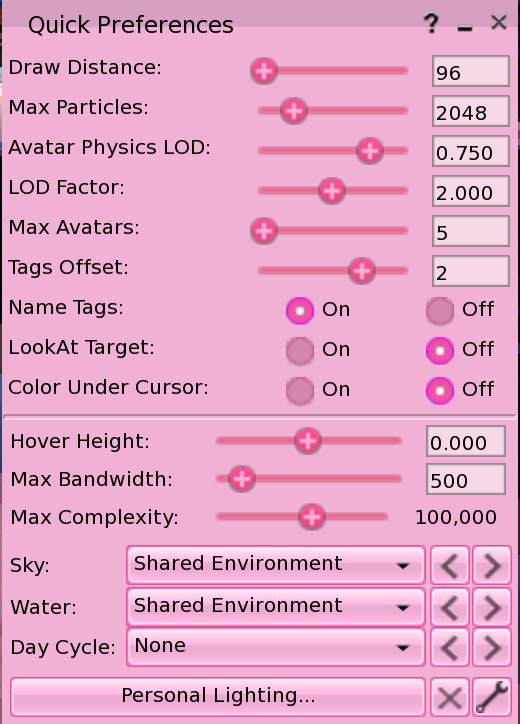
Quick Prefs: Finally, the Firestorm icon at the very bottom right are your quick preferences. This deserves a section all its own to explain:
And with that, the majority of SL's UI features have been explained. There are a few more UI features that will be explained as they become apparent, as they are common beginner questions, but this should allow you to understand how SL functions and what all of the otherwise confusing features do. Now, we shall begin to explore the grid!
HOME
When you first login, you'll begin at an area called a welcome hub. It should look something like this, with many other players who have just created an account. You'll see that usernames, display names, and group titles are all located above the heads of people's avatars, including your own (You'll be able to change/set the latter two in a bit). Before an avatar loads in entirely, it will appear as an orange cloud or as a white "egg", like in the screenshot.
Let's change some settings to make SL run better and make your experience easier. They are not necessary to playing, but they are what I use all the time (and for the purposes of this tutorial), and I will explain why they are set this way as I go. Hit CTRL+P or go to Avatar > Preferences at the top left of your screen.
Under General, select "General, Moderate, Adult" for what content you want to access. This does not necessarily mean you want to access NSFW content, but that you will be able to go to any region regardless of censorship rating, including those marked "Adult" without explicit NSFW content visible.
Under Graphics, set the preset slider to between "Low" and "Mid". Uncheckmark "Transparent water". These settings are to ensure SL runs smoothly on many lower end computers, but you can turn up the graphics if your computer is good. Ultimately, SL is extremely old and not well optimized, so most computers will get hot and chug along...
Under Move & View > Movement, checkmark "Pressing letter keys effects movement (ie. WASD)" and checkmark "Enable crouch toggle mode". Moving with WASD is the most common question I get when making an SL tutorial, and this will be most helpful for moving like a modern video game.
Under Privacy > LookAt, Checkmark everything except "Render lines to lookat target" and "Limit distance from head". In SL, A lookat target or crosshair is where someone's camera is positioned. It is helpful to turn these off because, to be blunt, There are some SL users will get mad at you if they see your crosshair looking at them, even if it's unintentional. So, this helps avoid that issue.
Under Firestorm > Avatar, Set the vertical and horizontal range of your avatar head movement to 0. Checkmark "Disable random avatar eye movements", and uncheckmark "Enable selection beam". This will make your avatar stay in place when you interact with things, and not emit a selection beam.
Additionally, under Skins, I use the Starlight Silver Pink skin for my UI. Choose one to your liking, as 99% of this tutorial will work regardless of the skin chosen.
Finally, all keys in SL can be rebound under the Controls tab. This tutorial assumes you use the default controls.
Once these settings are in place, I'm going to show you your toolbar. It should look something like this, and has the following items from left to right:
Nearby Chat: You can send messages to nearby chat here. Click the button that says "Nearby Chat" or hit / to type, Enter to send your message.
Guidebook: Firestorm's built-in tutorial. I would right-click and remove this button, you won't be using it.
Conversations: The speech bubble shows Nearby Chat, as well as IMs or group messages you receive/send. Chatlogs between logins are saved to your hard drive for a bit, but not for nearby chat.
Speak: The microphone which, when clicked, allows you to voice chat. It is push to talk with your mouse's scrollwheel, unless you checkmark it and click with left click, which toggles it. Some areas, like the welcome hub, have voice disabled, which will grey out the button.
Nearby Voice: The headphones show volumes for voice chat, and who is currently speaking. Ignore the voice morphing settings.
Walk/Run/Fly: The moving person lets you move your avatar by left clicking the buttons. However, WASD/arrow keys are likely easier. In terms of moving in SL, double-tapping W/up arrow makes you run, E makes you jump, F makes you fly (also holding down E), and C makes you crouch/fly down. You cannot fly in all areas.
Camera Controls: The eyeball controls your camera, which can move independently from your avatar. Alternatively, if you hold down CTRL+Alt and left click a spot on your screen, you can move your camera around that point, and zoom with mouse wheel. Hit Esc to return the camera behind your avatar's head. This is a bit of a tricky way to move your camera, but it gives you the most maneuverability.
People: The two people icon shows the people nearby, your friends (online and offline), groups you're in, people you've recently interacted with, your blocklist, and contact lists. You'll be looking at the first three tabs most of the time.
Appearance: The t-shirt will show you your outfits. You can save an outfit by hitting "Save as..." and giving it a memorable name, to return to later. While they're called outfits, this is also where you can save entirely different avatars, and switch between them by right clicking and hitting, "Wear - Replace Current Outfit".
Search: The magnifying glass lets you search many things across Second Life. Websearch is SL's built-in search for various listings, people lets you look up usernames, Groups lets you find groups to join, Places helps you find tagged locations to visit, Land Sales is where people sell parcels, Events lists upcoming events across SL, and Classifieds are looking for jobs. Again, you will almost entirely use this for place searches, and maybe looking for friends under people and groups.
Map: This shows you precisely how large SL is! You can zoom out and click around, and teleport to most any spot you select on the map. It might be an overwhelming thing for beginners, though.
Mini-Map: The radar shows a much smaller local map, showcasing nearby avatars and mesh models surrounding you. Useful if you're exploring!
Snapshot: The camera lets you take screenshots of your in-world adventures. You can configure the image crop, file type, folder location, etc. with this setting. Please note that taking a screenshot this way makes a sound in-world that some users get prickly about. Please ask for permission before taking a picture of someone.
Inventory: The suitcase is full of all of your items in SL. The "Recent" tab will show all items you've received and made in that login session, and "Wearing" shows only items you're wearing. If you don't like clutter, I recommend right clicking the "Inventory" folder and making some new folders for item organization, as your inventory will fill up fast and it is hard to organize at that point.
Animation Overrider: AO is a system for replacing your default animations for standing, walking, etc. I don't use this built-in setting typically, and instead use hud-based AOs, so I can't explain how it works.
Guidebook: Firestorm's built-in tutorial. I would right-click and remove this button, you won't be using it.
Conversations: The speech bubble shows Nearby Chat, as well as IMs or group messages you receive/send. Chatlogs between logins are saved to your hard drive for a bit, but not for nearby chat.
Speak: The microphone which, when clicked, allows you to voice chat. It is push to talk with your mouse's scrollwheel, unless you checkmark it and click with left click, which toggles it. Some areas, like the welcome hub, have voice disabled, which will grey out the button.
Nearby Voice: The headphones show volumes for voice chat, and who is currently speaking. Ignore the voice morphing settings.
Walk/Run/Fly: The moving person lets you move your avatar by left clicking the buttons. However, WASD/arrow keys are likely easier. In terms of moving in SL, double-tapping W/up arrow makes you run, E makes you jump, F makes you fly (also holding down E), and C makes you crouch/fly down. You cannot fly in all areas.
Camera Controls: The eyeball controls your camera, which can move independently from your avatar. Alternatively, if you hold down CTRL+Alt and left click a spot on your screen, you can move your camera around that point, and zoom with mouse wheel. Hit Esc to return the camera behind your avatar's head. This is a bit of a tricky way to move your camera, but it gives you the most maneuverability.
People: The two people icon shows the people nearby, your friends (online and offline), groups you're in, people you've recently interacted with, your blocklist, and contact lists. You'll be looking at the first three tabs most of the time.
Appearance: The t-shirt will show you your outfits. You can save an outfit by hitting "Save as..." and giving it a memorable name, to return to later. While they're called outfits, this is also where you can save entirely different avatars, and switch between them by right clicking and hitting, "Wear - Replace Current Outfit".
Search: The magnifying glass lets you search many things across Second Life. Websearch is SL's built-in search for various listings, people lets you look up usernames, Groups lets you find groups to join, Places helps you find tagged locations to visit, Land Sales is where people sell parcels, Events lists upcoming events across SL, and Classifieds are looking for jobs. Again, you will almost entirely use this for place searches, and maybe looking for friends under people and groups.
Map: This shows you precisely how large SL is! You can zoom out and click around, and teleport to most any spot you select on the map. It might be an overwhelming thing for beginners, though.
Mini-Map: The radar shows a much smaller local map, showcasing nearby avatars and mesh models surrounding you. Useful if you're exploring!
Snapshot: The camera lets you take screenshots of your in-world adventures. You can configure the image crop, file type, folder location, etc. with this setting. Please note that taking a screenshot this way makes a sound in-world that some users get prickly about. Please ask for permission before taking a picture of someone.
Inventory: The suitcase is full of all of your items in SL. The "Recent" tab will show all items you've received and made in that login session, and "Wearing" shows only items you're wearing. If you don't like clutter, I recommend right clicking the "Inventory" folder and making some new folders for item organization, as your inventory will fill up fast and it is hard to organize at that point.
Animation Overrider: AO is a system for replacing your default animations for standing, walking, etc. I don't use this built-in setting typically, and instead use hud-based AOs, so I can't explain how it works.
Quick Prefs: Finally, the Firestorm icon at the very bottom right are your quick preferences. This deserves a section all its own to explain:
Draw Distance: Adjusts how many meters away from your avatar to render. Default is set to 32m.
Max Particles: Adjusts the maximum amount of particles on screen.
Avatar Physics LOD: Setting to 1 enables avatar physics, most commonly used for jiggle effects on avatar breasts and butts. Setting to 0 disables this effect.
LOD Factor: Sets the level of detail (LOD) of prims and meshes. Lower gives better FPS, but less detail.
Max Avatars: Determines the maximum amount of avatars to fully render. Lower settings will still allow avatars to be visible, but not moving unless you bring your camera closer to them.
Tag Offset: Adjusts how far nametags sit above avatars. Useful for very small or very large avatars.
Name Tags: Turns nametags on and off, which is useful for de-cluttering your screen.
LookAt Target: Turns crosshairs (discussed in the aforementioned Preferences section) on and off.
Color Under Cursor: Turns on and off a setting that gives you the RGB code of whatever color sits under your cursor at that moment.
Hover Height: A slider meant to adjust how far your avatar 'hovers' off the ground; Most commonly adjusted so your avatar's feet stand right on the ground.
Max Bandwidth: The maximum allowance of bandwidth (Kbps) for SL. Best to not exceed 500.
Max Complexity: The maximum avatar complexity allowed to render avatars fully on your screen. Setting this lower can help FPS, and avatars that exceed the maximum complexity will be rendered as grey "jelly" blob people.
Sky: A dropdown containing windlights, or lighting settings for SL. Use whichever you like, although I prefer one with bright lights and minimal shadows for everyday use. Useful for taking themed photos.
Water: Similarly, a dropdown for changing the texture of Linden water. Not visible if transparent water is turned off, though.
Day Cycle: A dropdown menu for initiating a day and night cycle for lighting settings, changing as time goes on.
Personal Lighting: A separate menu that can be opened to minutely adjust a given windlight. Mainly used for photo taking, or the creation of new windlights.
Max Particles: Adjusts the maximum amount of particles on screen.
Avatar Physics LOD: Setting to 1 enables avatar physics, most commonly used for jiggle effects on avatar breasts and butts. Setting to 0 disables this effect.
LOD Factor: Sets the level of detail (LOD) of prims and meshes. Lower gives better FPS, but less detail.
Max Avatars: Determines the maximum amount of avatars to fully render. Lower settings will still allow avatars to be visible, but not moving unless you bring your camera closer to them.
Tag Offset: Adjusts how far nametags sit above avatars. Useful for very small or very large avatars.
Name Tags: Turns nametags on and off, which is useful for de-cluttering your screen.
LookAt Target: Turns crosshairs (discussed in the aforementioned Preferences section) on and off.
Color Under Cursor: Turns on and off a setting that gives you the RGB code of whatever color sits under your cursor at that moment.
Hover Height: A slider meant to adjust how far your avatar 'hovers' off the ground; Most commonly adjusted so your avatar's feet stand right on the ground.
Max Bandwidth: The maximum allowance of bandwidth (Kbps) for SL. Best to not exceed 500.
Max Complexity: The maximum avatar complexity allowed to render avatars fully on your screen. Setting this lower can help FPS, and avatars that exceed the maximum complexity will be rendered as grey "jelly" blob people.
Sky: A dropdown containing windlights, or lighting settings for SL. Use whichever you like, although I prefer one with bright lights and minimal shadows for everyday use. Useful for taking themed photos.
Water: Similarly, a dropdown for changing the texture of Linden water. Not visible if transparent water is turned off, though.
Day Cycle: A dropdown menu for initiating a day and night cycle for lighting settings, changing as time goes on.
Personal Lighting: A separate menu that can be opened to minutely adjust a given windlight. Mainly used for photo taking, or the creation of new windlights.
And with that, the majority of SL's UI features have been explained. There are a few more UI features that will be explained as they become apparent, as they are common beginner questions, but this should allow you to understand how SL functions and what all of the otherwise confusing features do. Now, we shall begin to explore the grid!
HOME
